Transformation | O Level Mathematics 4024 & IGCSE Mathematics 0580 | Detailed Free Notes To Score An A Star (A*)
Reflection Transformation
- Remember, for any transformation, you need to remember the few important parts that those transformations are based on
- In this post, we will focus on reflection using horizontal and vertical line of reflections. The next post will focus on diagonal line of reflection, along with some special tricks that can be used to mentally solve some reflection transformations.
Content by Educate A Change (by Hunain Zia) | Copyrighted by AYLOTI | Redistribution, download, sharing, selling or any form of unauthorized use of data is strictly prohibited |
- Reflection is based on line of reflection ONLY.
- The deciding factor for any reflection is line of reflection.
- Some important terms
- Object: The original points.
- Image: The transformed points.
- In your exam, make sure you read very carefully if you are asked to map the OBJECT onto the image OR the image onto the object. This is a very common mistake.
- How to map an object using transformation to find the image?
- Step 1: Draw the line of transformation
- If the line of transformation is horizontal or vertical but not diagonal, you can use the steps mentioned below.
- Step 2: Draw a dotted line from each point to the line of transformation.
- Step 3: Measure the distance from the each of the coordinates of the object to the line of transformation. On a graph paper, it is the number of boxes from the object to the line.
- Step 4: Measure equal boxes on the other side of the line of reflection. Point the image points one by one.
- Step 1: Draw the line of transformation
Content by Educate A Change (by Hunain Zia) | Copyrighted by AYLOTI | Redistribution, download, sharing, selling or any form of unauthorized use of data is strictly prohibited |
- First, let us see an example of horizontal and vertical lines of reflection, before moving on to the more complex diagonal lines of reflection.
- REMEMBER, ANY POINT ON THE LINE OF REFLECTION WILL REMAIN WHERE IT WAS after the reflection.
- However, the name of the point will change from object to image. So, if point X was to be mapped on point T, and X is on the line of reflection, then after the transformation, X will be named T on the same spot as it was initially.
- Dotted line
- Used where what you draw is not part of the final image but just rough work.
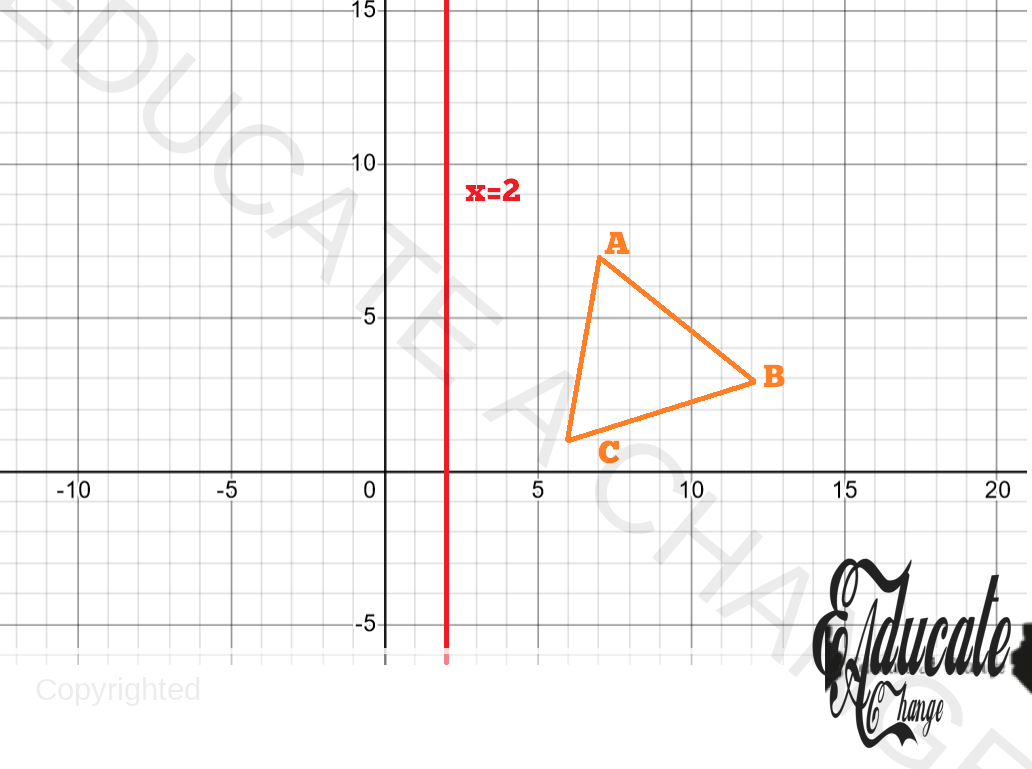
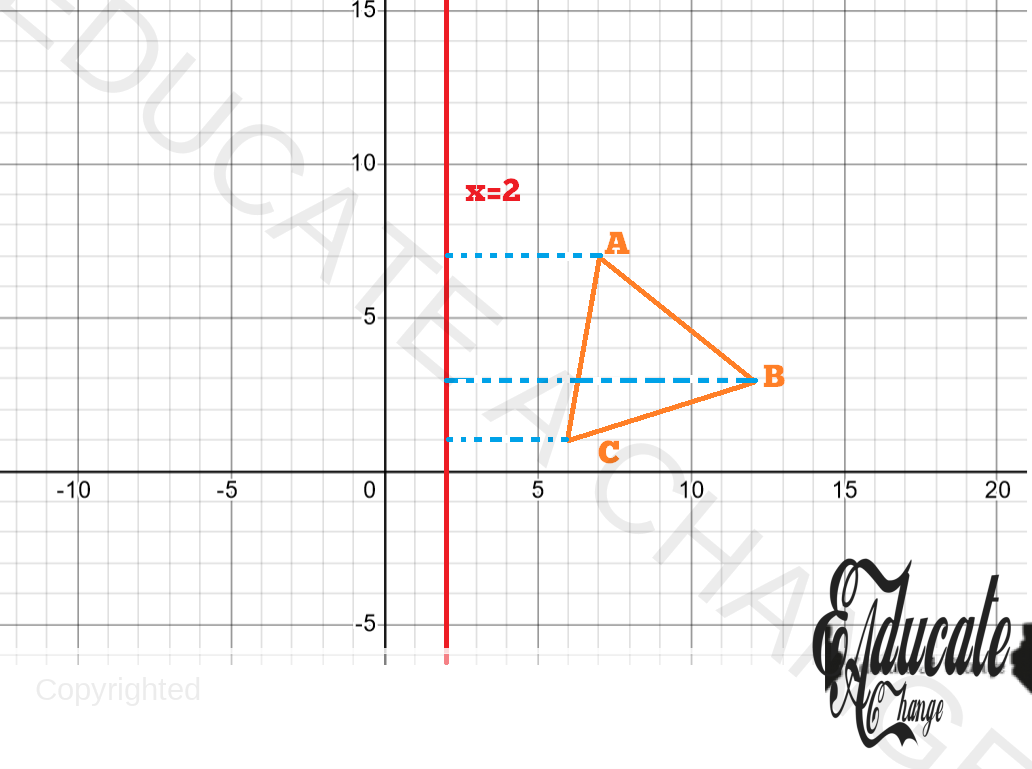
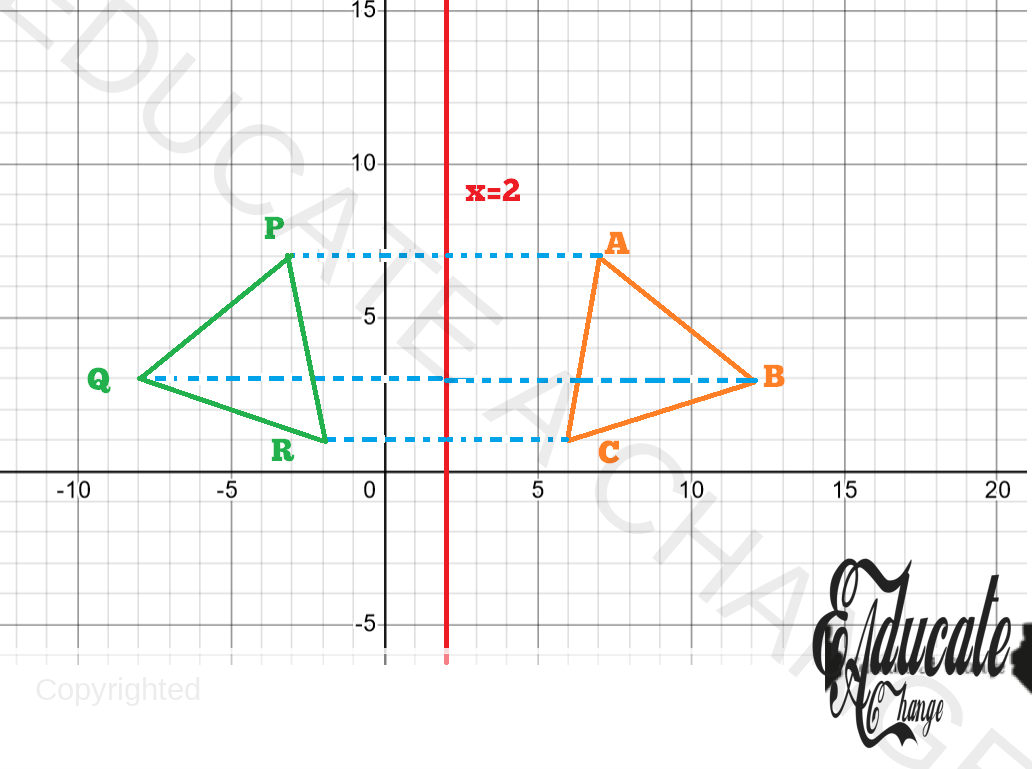
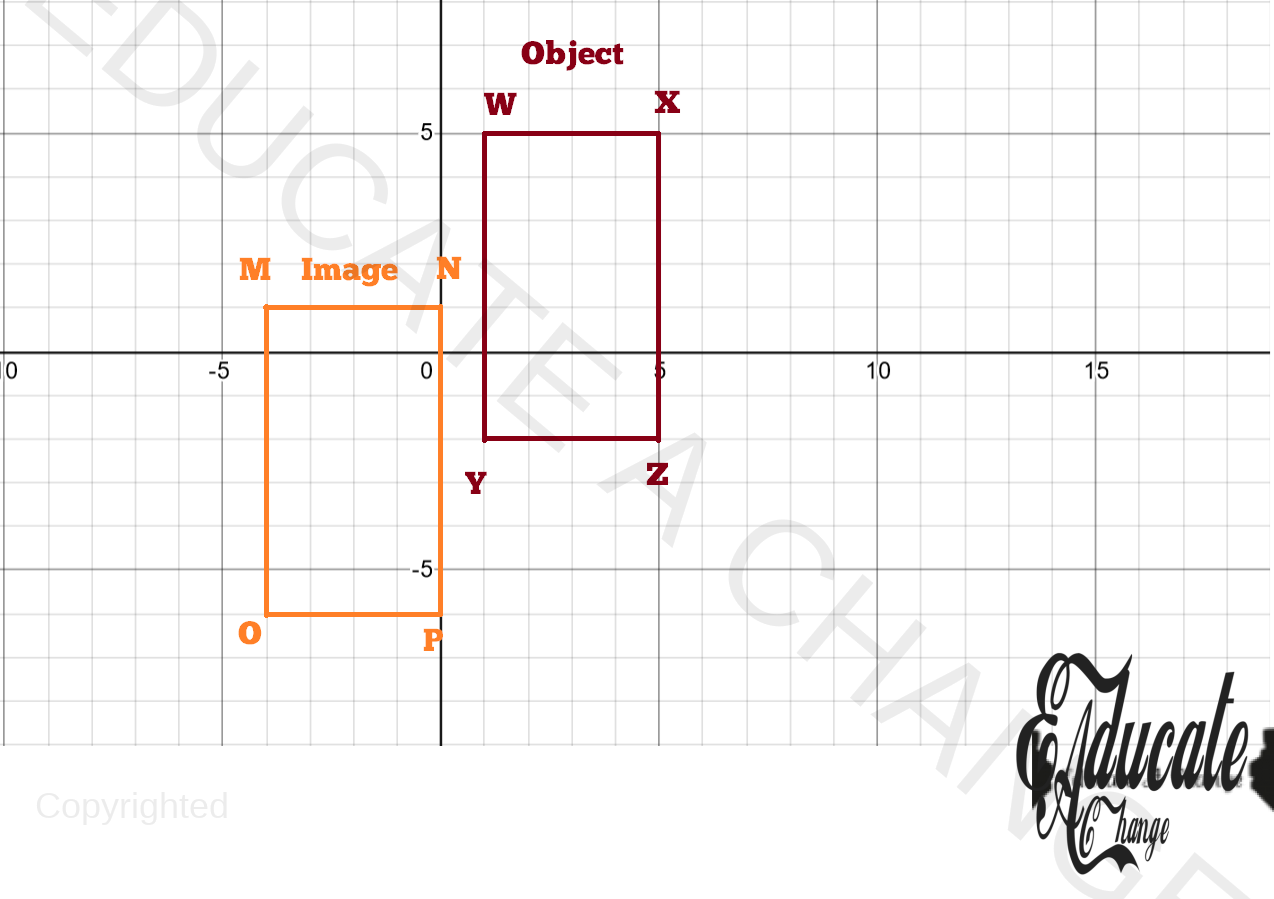
A Simple Example With Vertical Line of Reflection: Points On Only One Side
- You are required to map object ABC on image PQR using x=2 as the line of reflection
Content by Educate A Change (by Hunain Zia) | Copyrighted by AYLOTI | Redistribution, download, sharing, selling or any form of unauthorized use of data is strictly prohibited |
Step 1: Join each point to the line of reflection
Content by Educate A Change (by Hunain Zia) | Copyrighted by AYLOTI | Redistribution, download, sharing, selling or any form of unauthorized use of data is strictly prohibited |
Step 2: Extend the lines in the same length to the other side of the line of reflection

Content by Educate A Change (by Hunain Zia) | Copyrighted by AYLOTI | Redistribution, download, sharing, selling or any form of unauthorized use of data is strictly prohibited |
Step 3: Mark the image
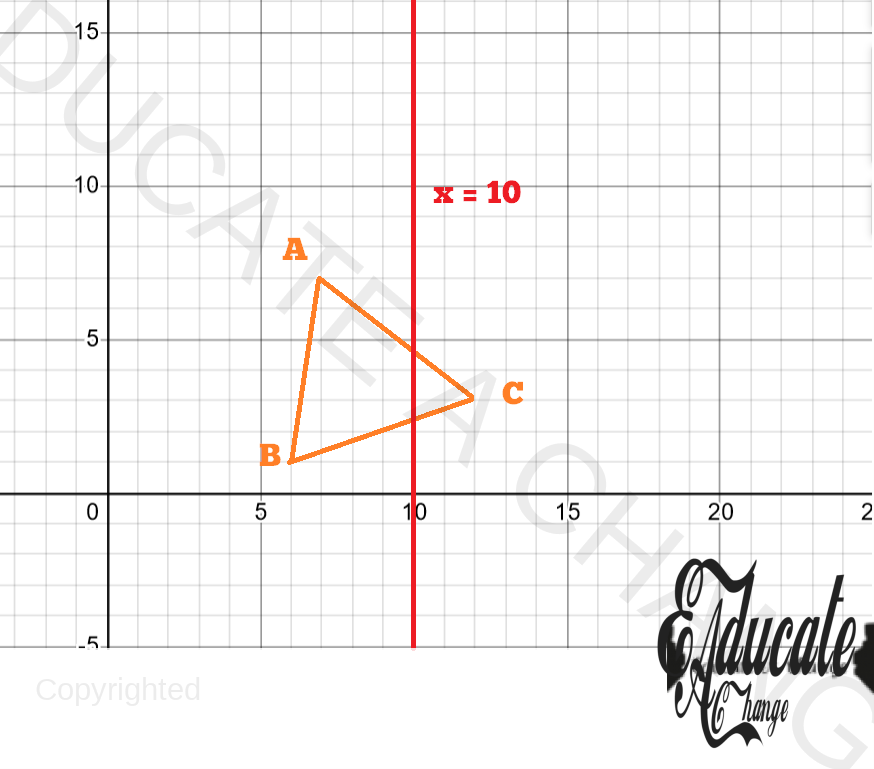
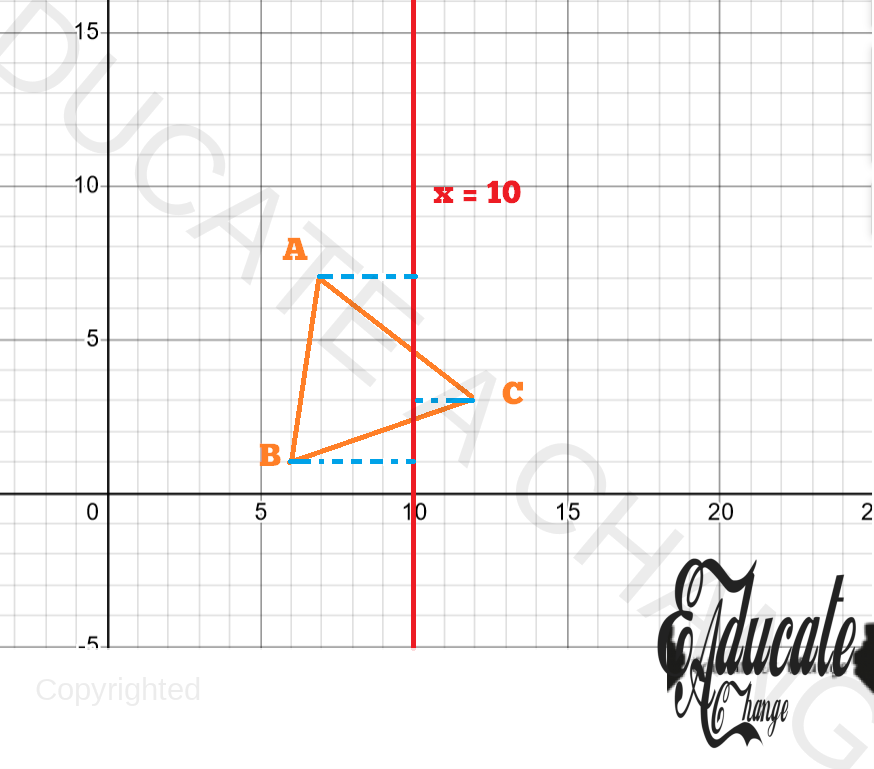
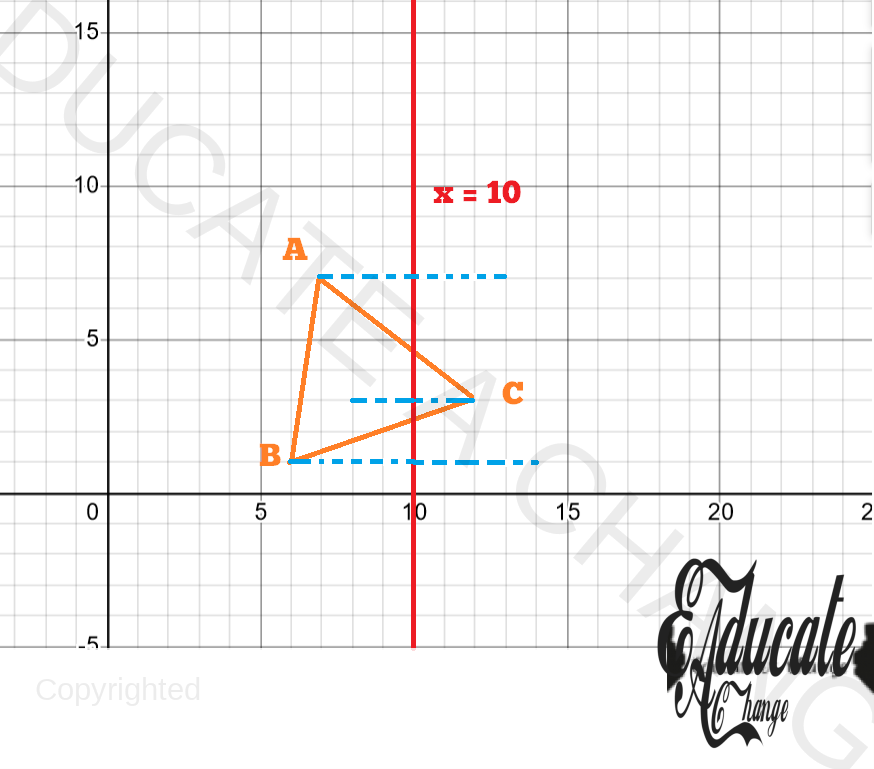
A Complex Example Using Vertical Line of Reflection Which Passes Through The Object.
- You need to map the object above ABC on its image LMN using the line of reflection x=10
Content by Educate A Change (by Hunain Zia) | Copyrighted by AYLOTI | Redistribution, download, sharing, selling or any form of unauthorized use of data is strictly prohibited |
Step 1: Join each point to the line of reflection
Content by Educate A Change (by Hunain Zia) | Copyrighted by AYLOTI | Redistribution, download, sharing, selling or any form of unauthorized use of data is strictly prohibited |
Step 2: Extend the lines in the same length to the other side of the line of reflection. Remember, The OTHER SIDE of the line of reflection for EACH Point is different, DEPENDING ON which side the individual object point itself is at the start.
Step 3: Mark the image

Content by Educate A Change (by Hunain Zia) | Copyrighted by AYLOTI | Redistribution, download, sharing, selling or any form of unauthorized use of data is strictly prohibited |
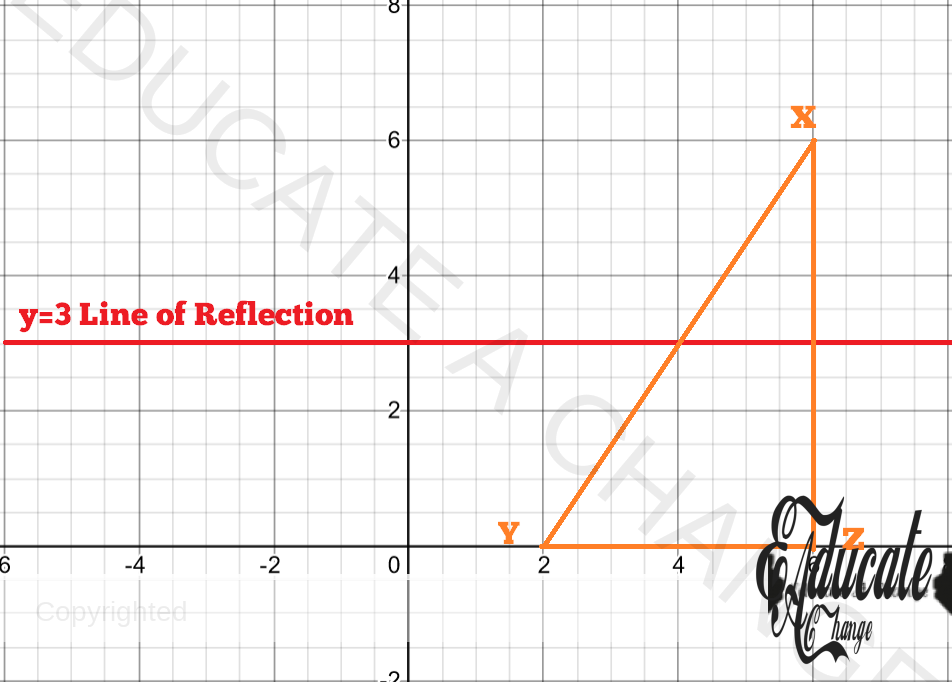
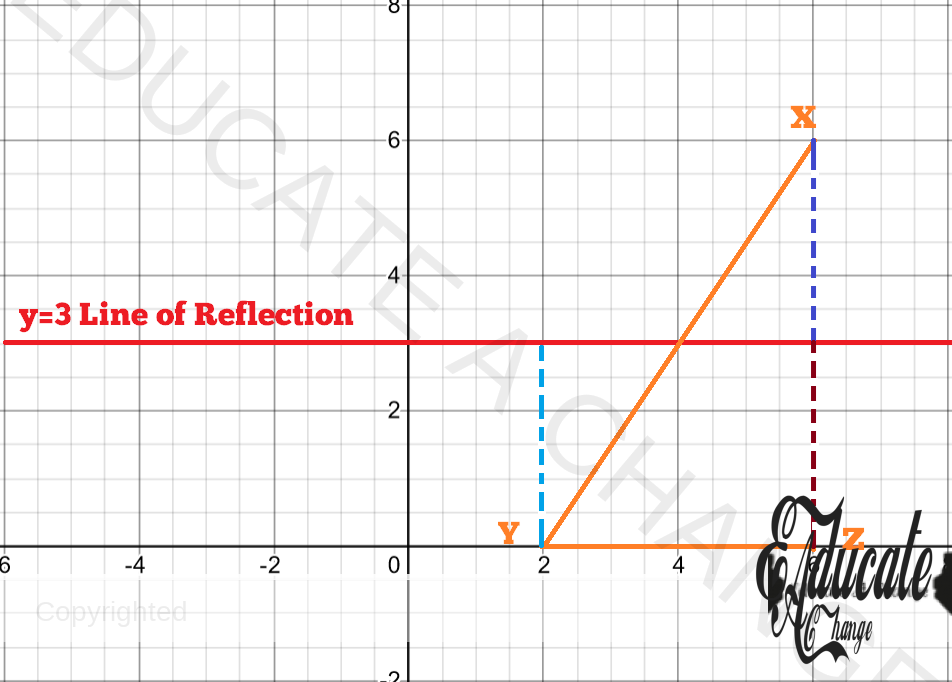
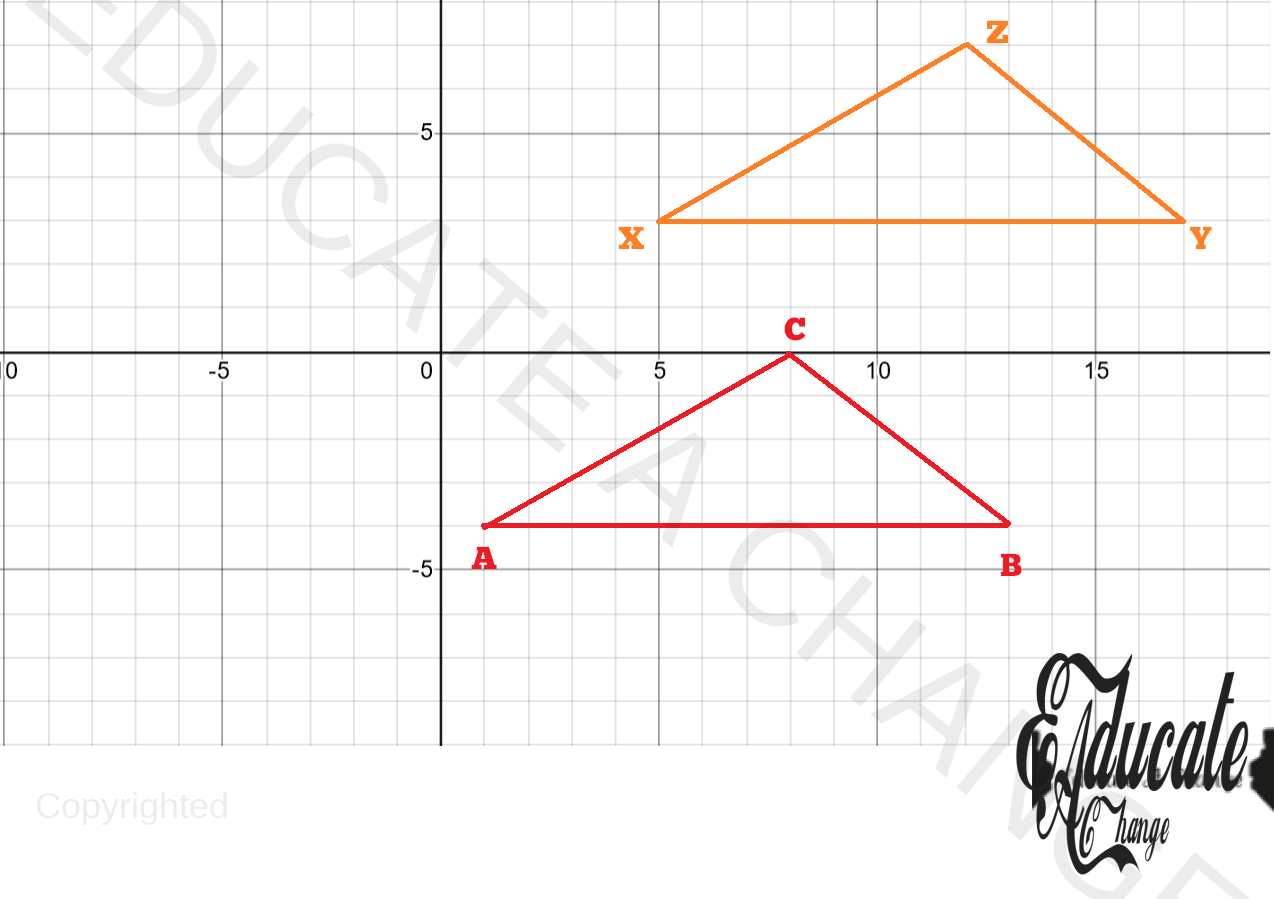
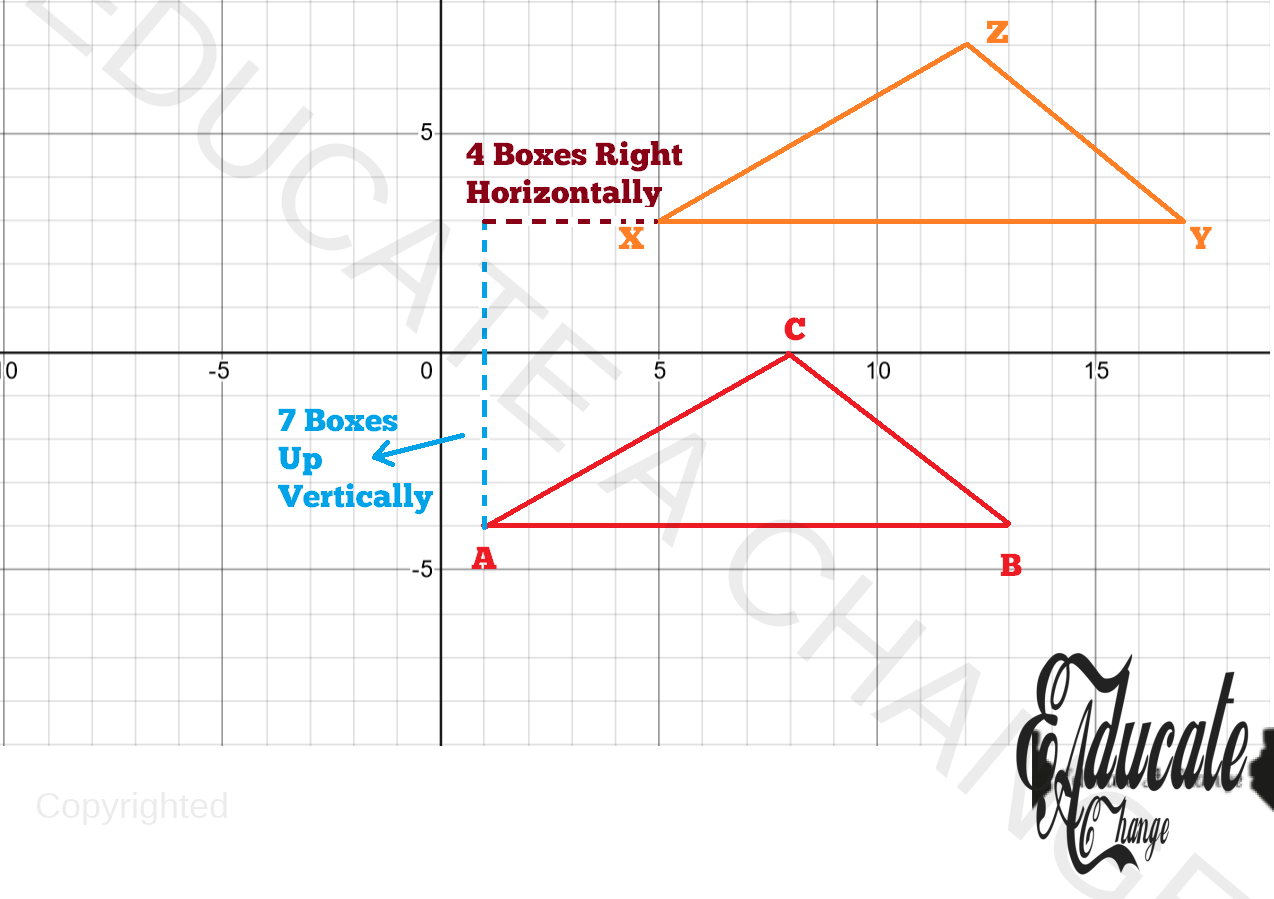
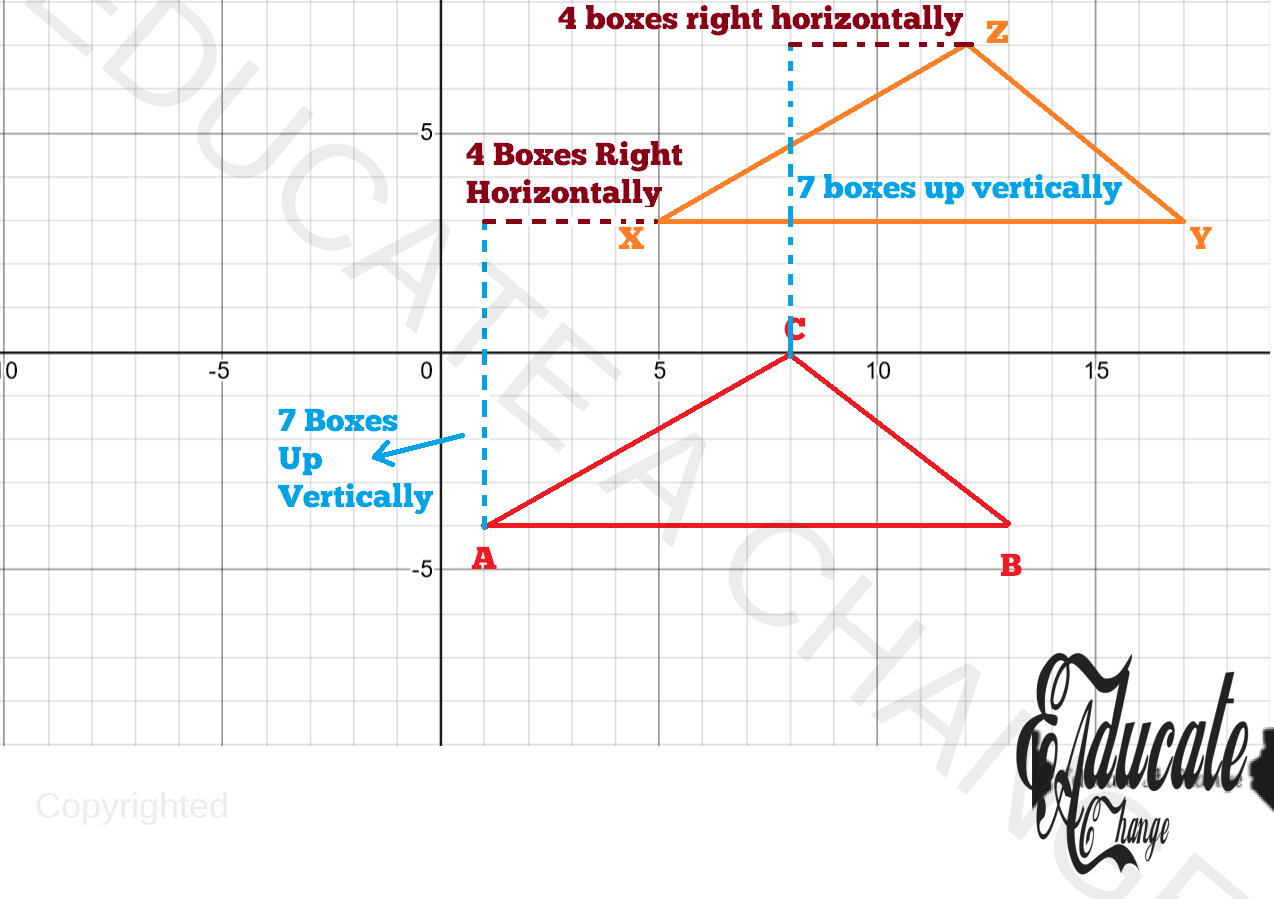
A More Complex Example Involving Object On Both Sides That Map On To Each Other With Horizontal Line of Reflection
- In the diagram below, the line of reflection is y= 2. Reflect the object XYZ to its image ABC
- To recall a few simple things
- A line that is given in terms of y= (number) is a horizontal line. On the contrary a line that has x= (number) is a vertical line. Any line with y= mx+c is not a horizontal or vertical line.
- In the question Our object is XYZ, the given thing.
- After transformation, our image will be ABC.
- Remember, we have to label it correctly.
- X will become A
- Y will become B
- Z will become C
- Remember, we have to label it correctly.
- To recall a few simple things
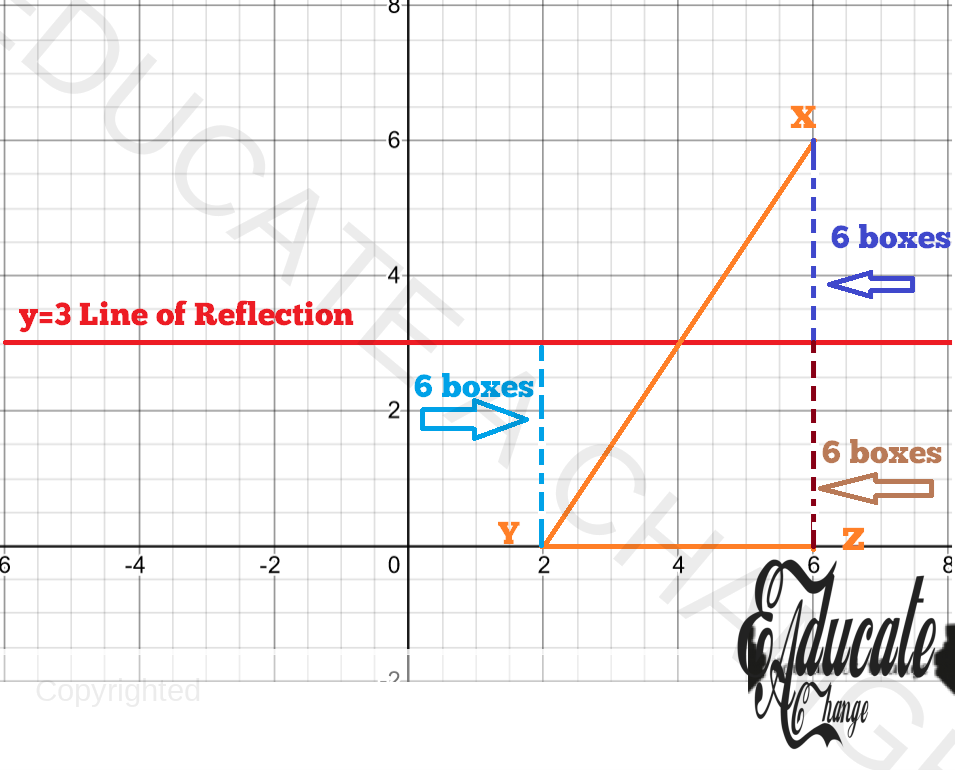
Step 1: We will Join each Point to the line of reflection using a dotted line.
Content by Educate A Change (by Hunain Zia) | Copyrighted by AYLOTI | Redistribution, download, sharing, selling or any form of unauthorized use of data is strictly prohibited |
Step 2: Count the boxes in between for each
Content by Educate A Change (by Hunain Zia) | Copyrighted by AYLOTI | Redistribution, download, sharing, selling or any form of unauthorized use of data is strictly prohibited |
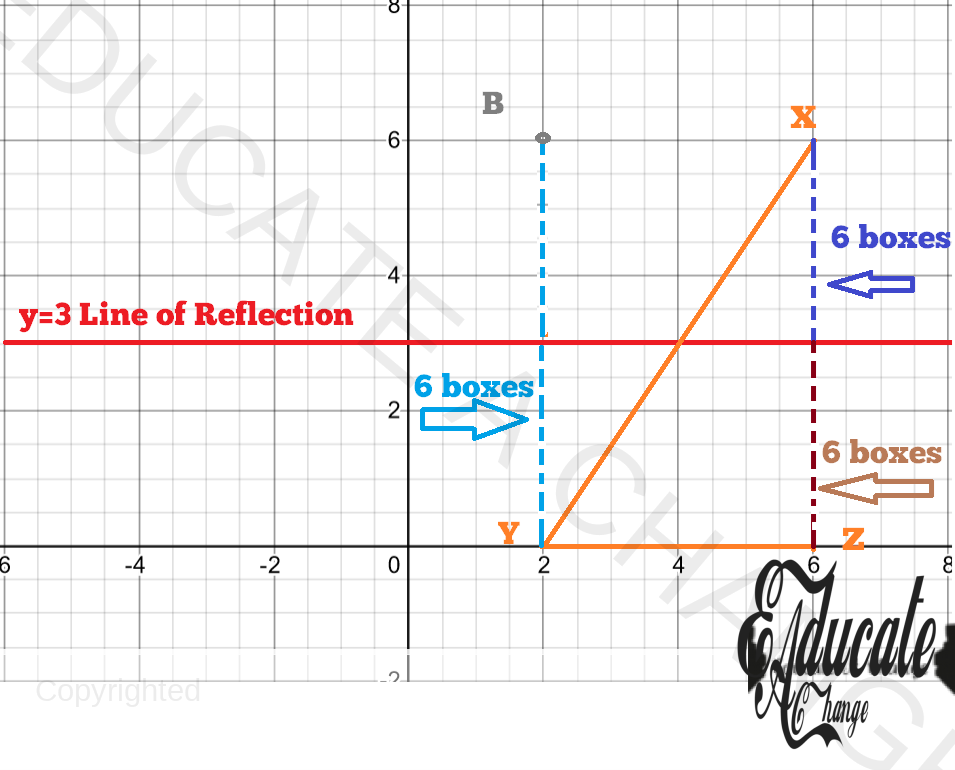
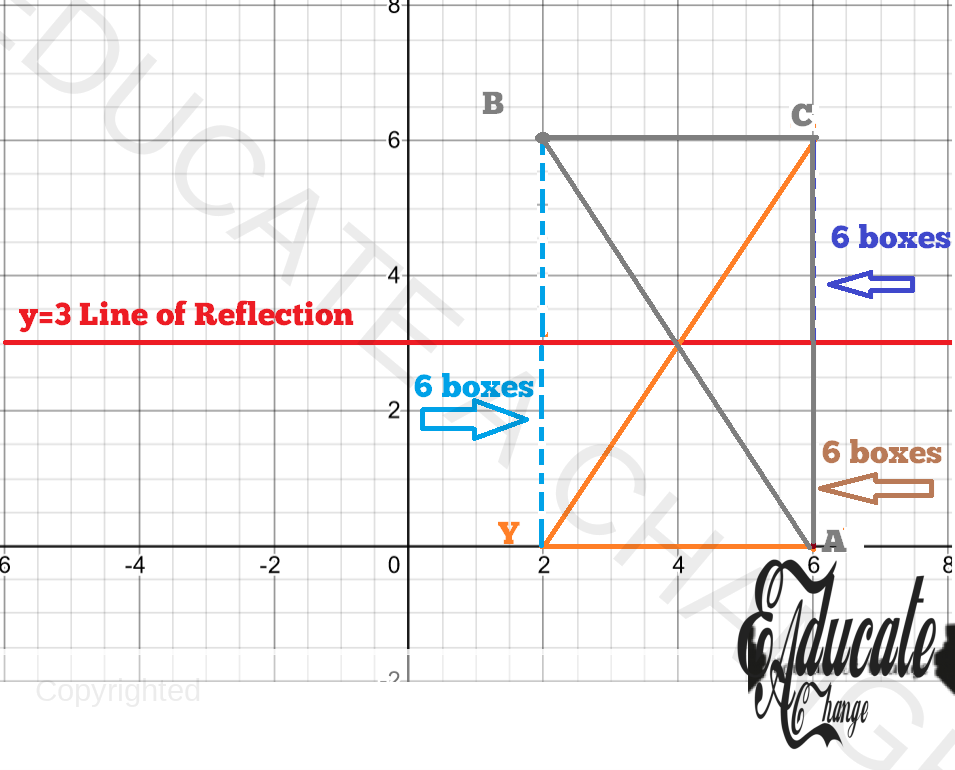
Step 3: Now point the Image Mark on the opposite side of the line with the same distance
- Y will become B
- The Complex part here is X and Z
- As they are on the same vertical line and at the same distance from the line of reflection, they will map onto each other.
- X will reflected at Point A at the same place as Z
- Z will be reflect at Point C at the same place as X
- The final image would look like
- As they are on the same vertical line and at the same distance from the line of reflection, they will map onto each other.
Translation
- Just like reflection needs a line of reflection, translation is done using a translation vector. It can be given in the form of coordinates as well. However, the final answer of translation vector is ALWAYS in vector form. Remember that.
Content by Educate A Change (by Hunain Zia) | Copyrighted by AYLOTI | Redistribution, download, sharing, selling or any form of unauthorized use of data is strictly prohibited |
- Important information before we can do transformation.
- For the x-coordinate
- One box on the graph paper movement towards the right is +1.
- One box on the graph paper movement towards the left is -1.
- For the y-coordinate
- One box movement on the graph paper upwards is +1
- One box movement of the graph paper downwards is -1
- There are two things we must know how to do.
- First, if we are given the object and the image, we need to know how to find the translation vector.
- Second, if we are given the translation vector, we should be able to map the image on the object.
- Third, if we are given the translation vector and the image, we should be able to use the reverse of the translation vector to map the image on the object.
- For the x-coordinate
Content by Educate A Change (by Hunain Zia) | Copyrighted by AYLOTI | Redistribution, download, sharing, selling or any form of unauthorized use of data is strictly prohibited |
-
-
- The Fourth is Translation vector using matrices.
- Let us check out each of them.
-
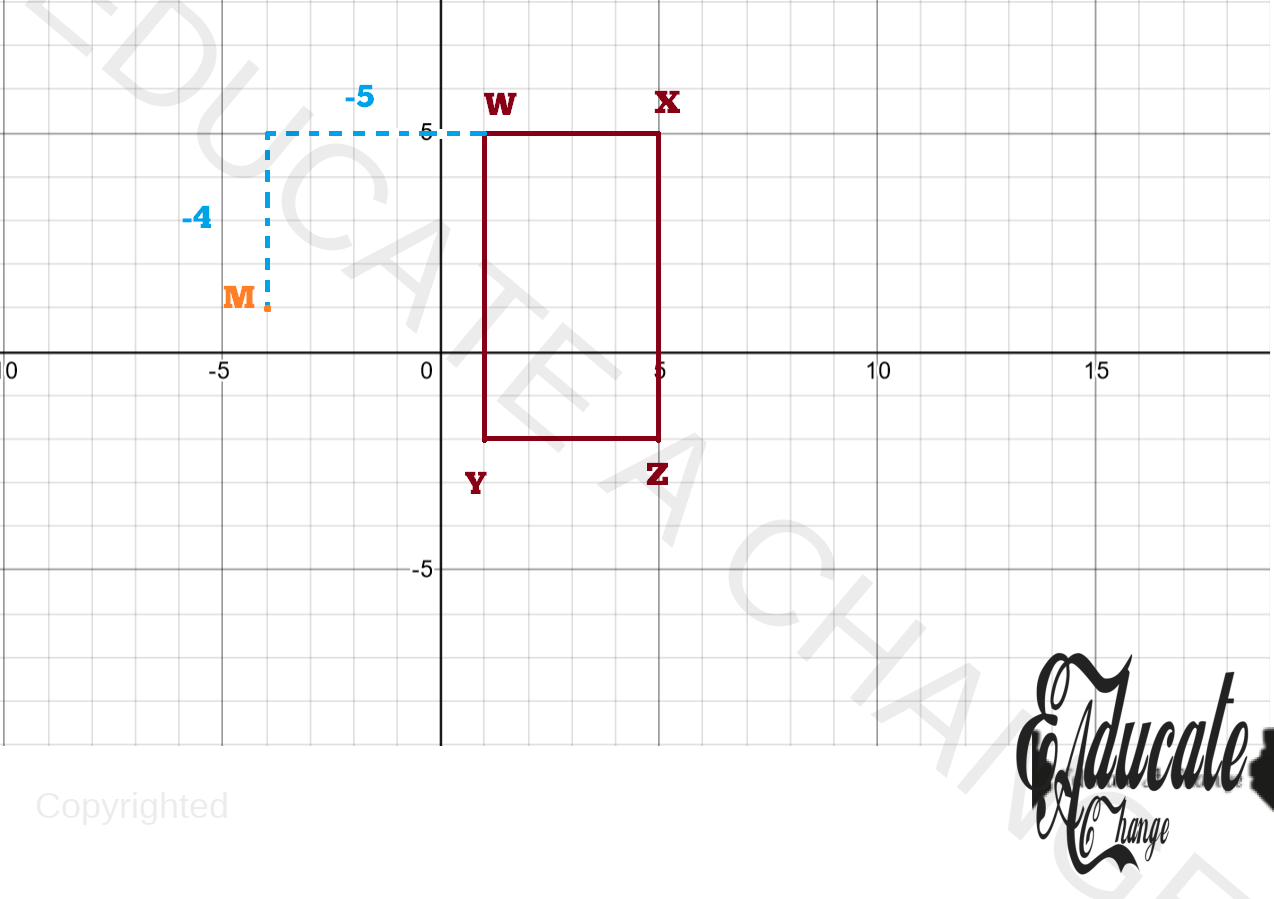
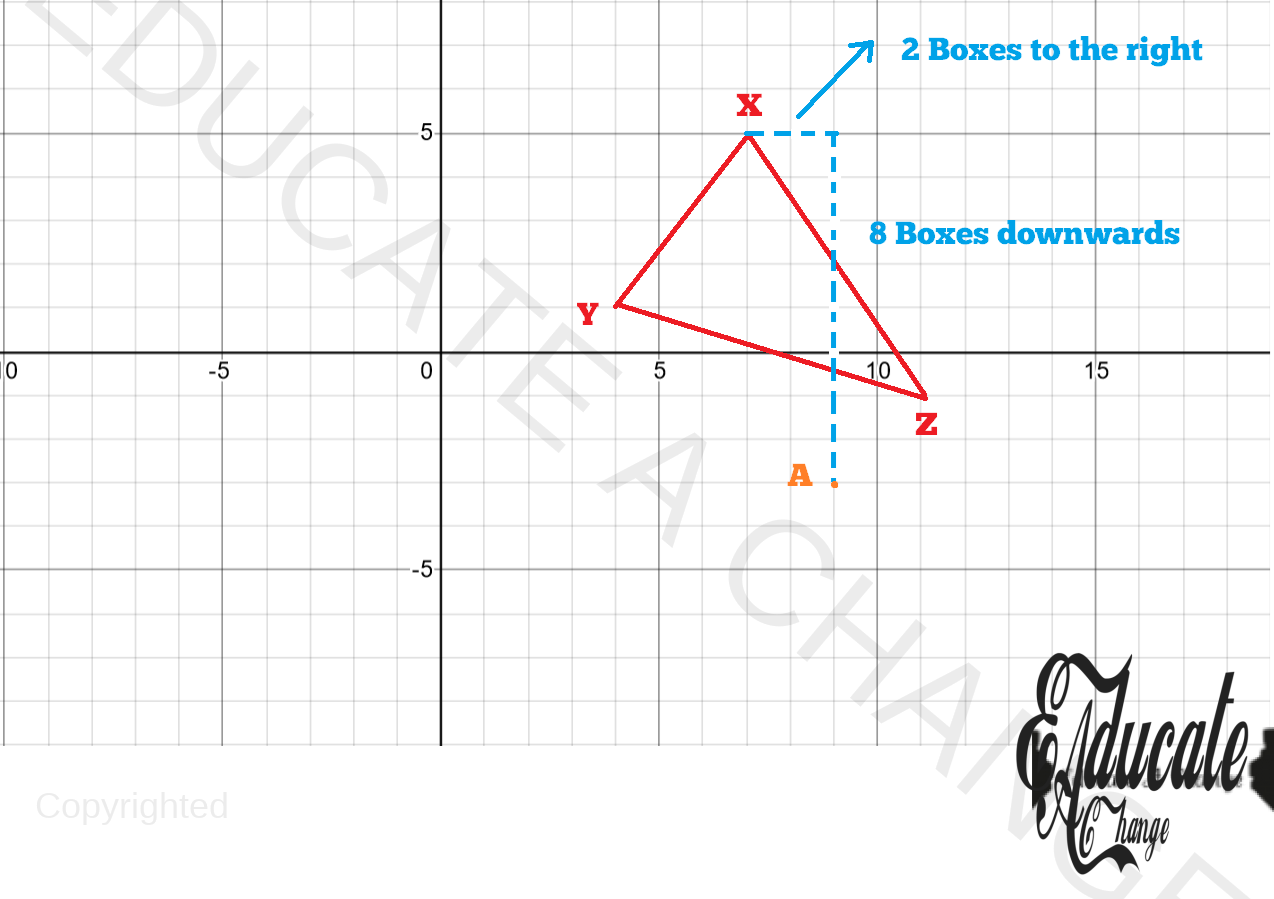
How to Find the Translation Vector When Object and Image Are Given?
- In the given question, Triangle ABC has been mapped onto its image triangle XYZ using translation. We have to find the translation vector
- NOTE: CAREFULLY read which triangle in the image and which one is the object as it makes a huge difference in translation questions.
Content by Educate A Change (by Hunain Zia) | Copyrighted by AYLOTI | Redistribution, download, sharing, selling or any form of unauthorized use of data is strictly prohibited |
Step 1: Take one point from the object and its CORRESPONDING IMAGE. Corresponding means the point that is the image of the point we selected. So, we will select the paid A and its image X. Now count the boxes that we have moved in each direction (horizontally and vertically).
- So our movement in x axis is +4 (as we moved right) and our movement in y axis is +7 (as we moved up)
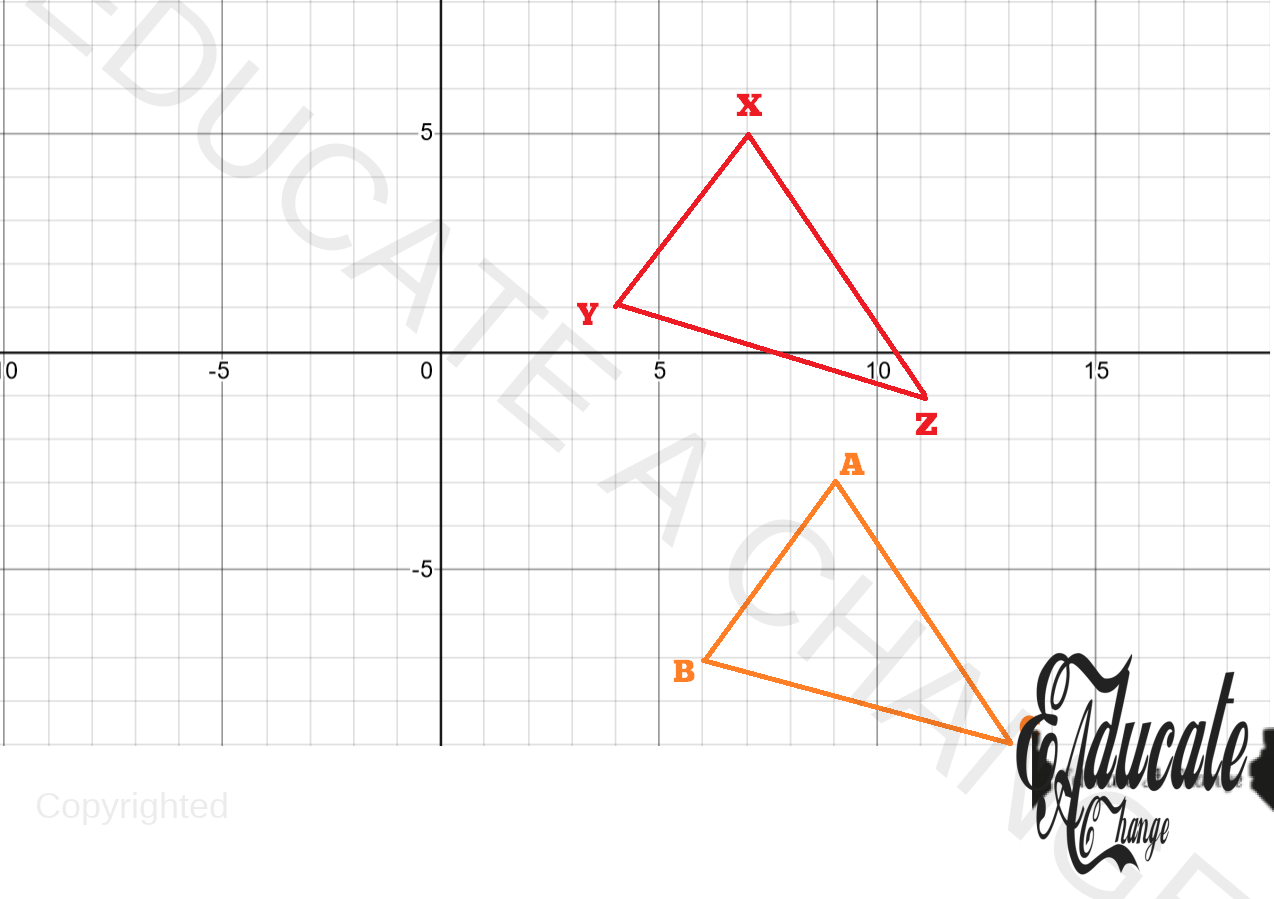
Step 2: Form the Vector
- Vectors are in the following format here

- Here the change in x is +4 and the change in y is + 7
- So the translation vector is

Content by Educate A Change (by Hunain Zia) | Copyrighted by AYLOTI | Redistribution, download, sharing, selling or any form of unauthorized use of data is strictly prohibited |
Step 3: Check your vector by selecting one other point and seeing if the vector maps the object on the image.
Second Type: Finding the image using the translation vector and the object
- Map the object WXYZ below on to the image MNOP using the translation vector


Content by Educate A Change (by Hunain Zia) | Copyrighted by AYLOTI | Redistribution, download, sharing, selling or any form of unauthorized use of data is strictly prohibited |
Step 1: Take the first point and apply the translation vector on it. Our vector has x -5 which means we have to move left by 5 boxes, and y is -4 which means we have to move down by 4 boxes.
Step 2: Do the same for the rest of the points and mark the image.
Content by Educate A Change (by Hunain Zia) | Copyrighted by AYLOTI | Redistribution, download, sharing, selling or any form of unauthorized use of data is strictly prohibited |
Third Type: You Have The Original Translation Vector and the Image. You need to find the Object.
- You have the IMAGE XYZ given and the original translation vector that mapped ABC on XYZ was. Find ABC.
Step 1: Find the translation vector that will mark the image onto the object.
- Just change the signs of the translation vector that mapped the object onto the image to find the translation vector that will map the image on the object.
- So our translation vector that will map the image on the object will become
Content by Educate A Change (by Hunain Zia) | Copyrighted by AYLOTI | Redistribution, download, sharing, selling or any form of unauthorized use of data is strictly prohibited |
Step 2: Take one point of the image and mark it on the object
Step 3: Mark the rest of the points of the object in the same way
Content by Educate A Change (by Hunain Zia) | Copyrighted by AYLOTI | Redistribution, download, sharing, selling or any form of unauthorized use of data is strictly prohibited |
Fourth Type: Matrices
- Remember, the formula for translation vector is Image – Object.
- So , if the coordinates of your image is (1,0) and the coordinates of the object were (5,6) then the translation vector is
- You do not need to do it with EVERY point in the object and image. Instead, just take one object point and ITS CORRESPONDING IMAGE POINT and use it. Remember, corresponding only.
- For example

Content by Educate A Change (by Hunain Zia) | Copyrighted by AYLOTI | Redistribution, download, sharing, selling or any form of unauthorized use of data is strictly prohibited |
- Let us say XYZ is the object and ABC is the image.
- If I take point X as object, I will take point A as image.
- If I take point Y as object, I will take point B as image.
- If I take Z as object, I will take point C as image.
- Let us take point Y and B (NO MATTER WHICH PAIR YOU CHOOSE, as long as they are CORRESPONDING, the answer will be the same)
- y has coordinates (4,1)
- b has coordinates (6,-7)
- Let us find the translation vector

- So maps XYZ on to ABC.
- You can counter check it by either applying it to another pair, or taking another pair and solving the equation for them as well.
Content by Educate A Change (by Hunain Zia) | Copyrighted by AYLOTI | Redistribution, download, sharing, selling or any form of unauthorized use of data is strictly prohibited |
Enlargement
- For enlargement, we need enlargement factor/ scale factor and center of enlargement. There are 2 things you must remember to ensure that can attempt the enlargement questions successfully.
- The SIGN of your enlargement factor/ scale factor determines WHICH SIDE of the center of enlargement will your image be drawn.
- If the enlargement factor/ scale factor has a positive value, the image will be drawn on the same side of the center of enlargement as the object.
- If the enlargement factor/ scale factor has a negative or – value, the image will be drawn on the opposite side of the center of enlargement as the object.
- The value of the enlargement factor/ scale factor will decide if the object will increase in size or decrease in size when mapped on the image.
- A value of GREATER THAN 1 will mean that the image will be larger than the object.
- A value of LESSER THAN 1 will mean that the image will be smaller than the object.
- Common mistake in enlargement
- REMEMBER, you will count BOTH the object AND the image from the center of enlargement. The most common mistake is to count the image from the object instead of the center of enlargement. DO NOT MAKE THIS MISTAKE.
- The SIGN of your enlargement factor/ scale factor determines WHICH SIDE of the center of enlargement will your image be drawn.
Content by Educate A Change (by Hunain Zia) | Copyrighted by AYLOTI | Redistribution, download, sharing, selling or any form of unauthorized use of data is strictly prohibited |
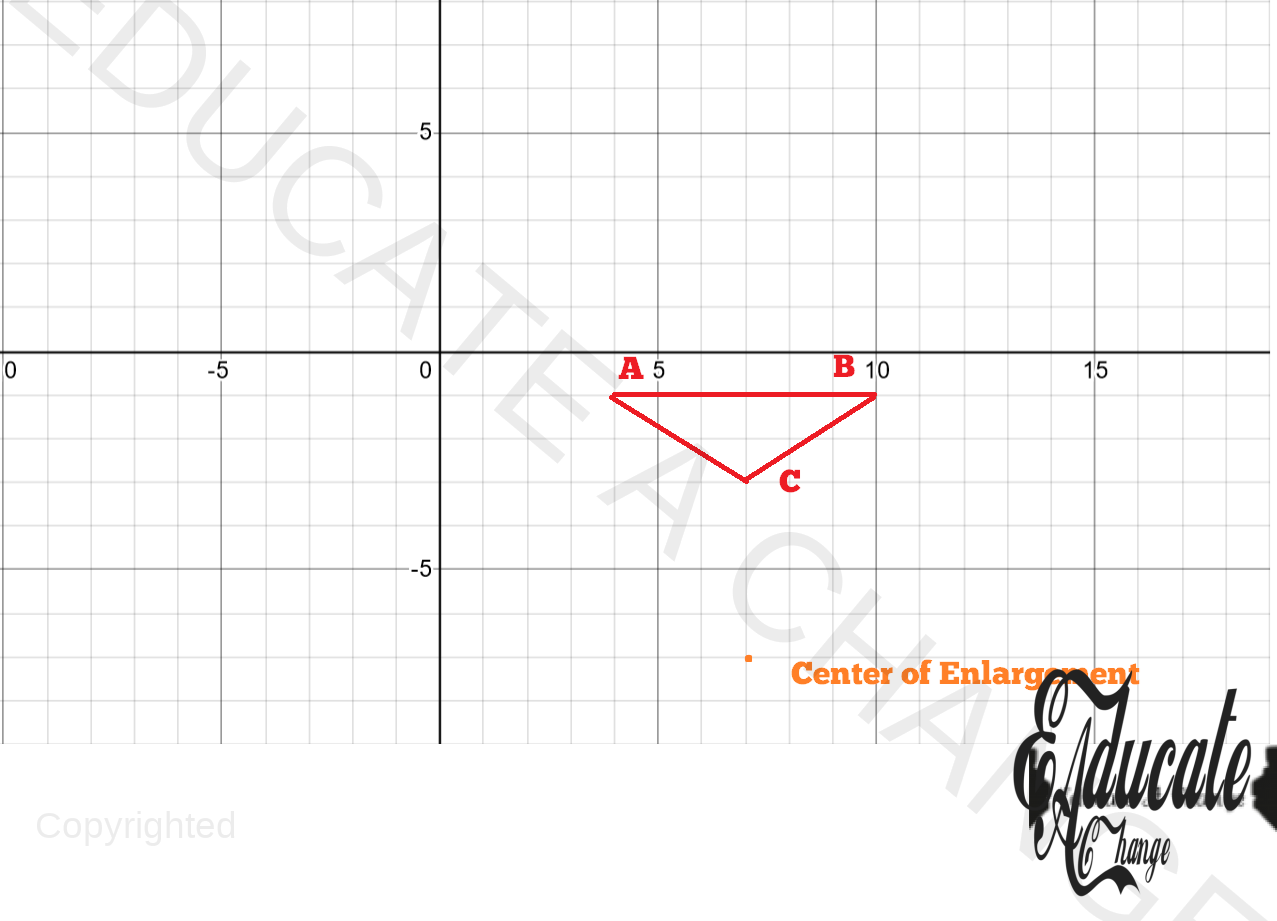
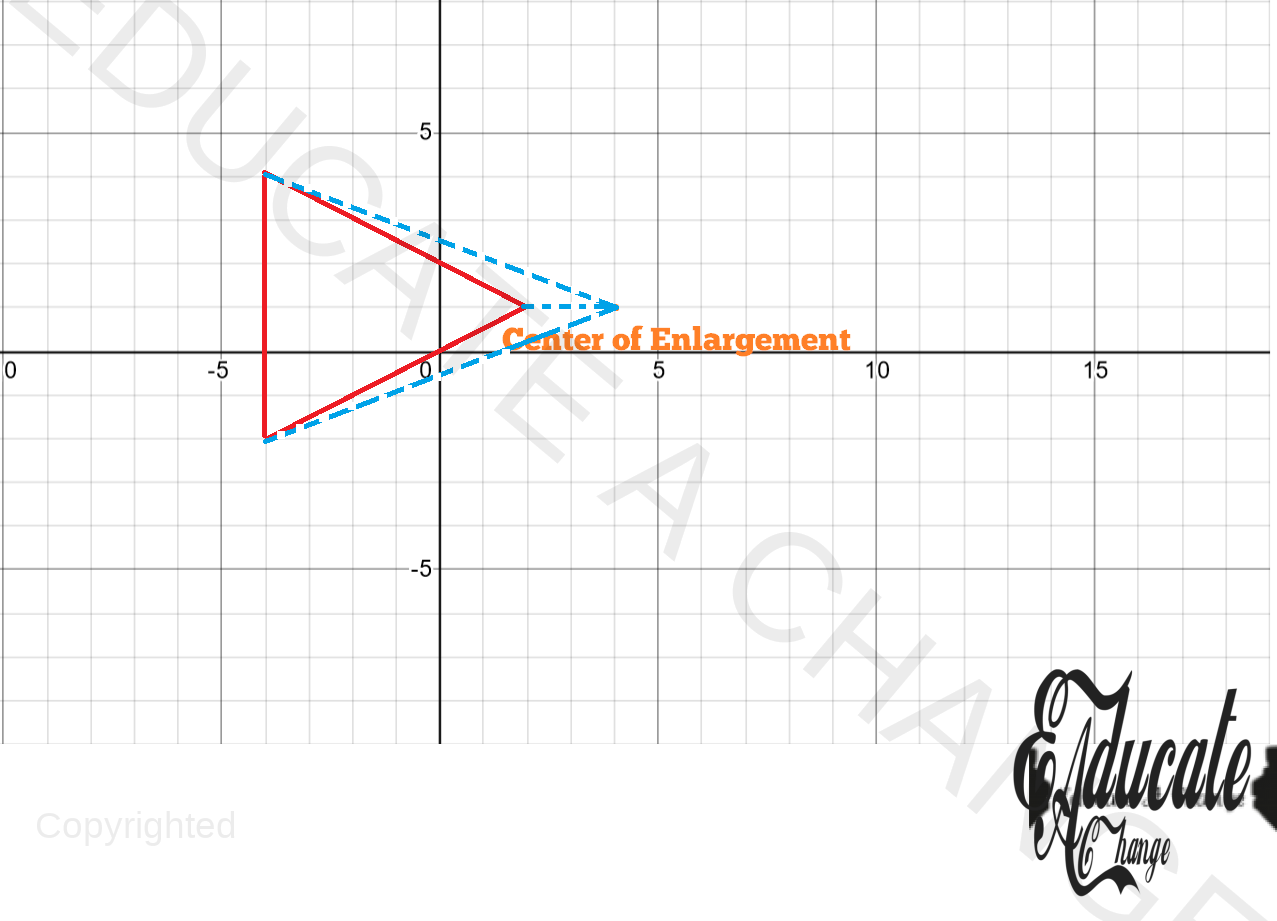
How to find the image if the object, Center of Enlargement and Enlargement Factor/ Scale Factor are given?
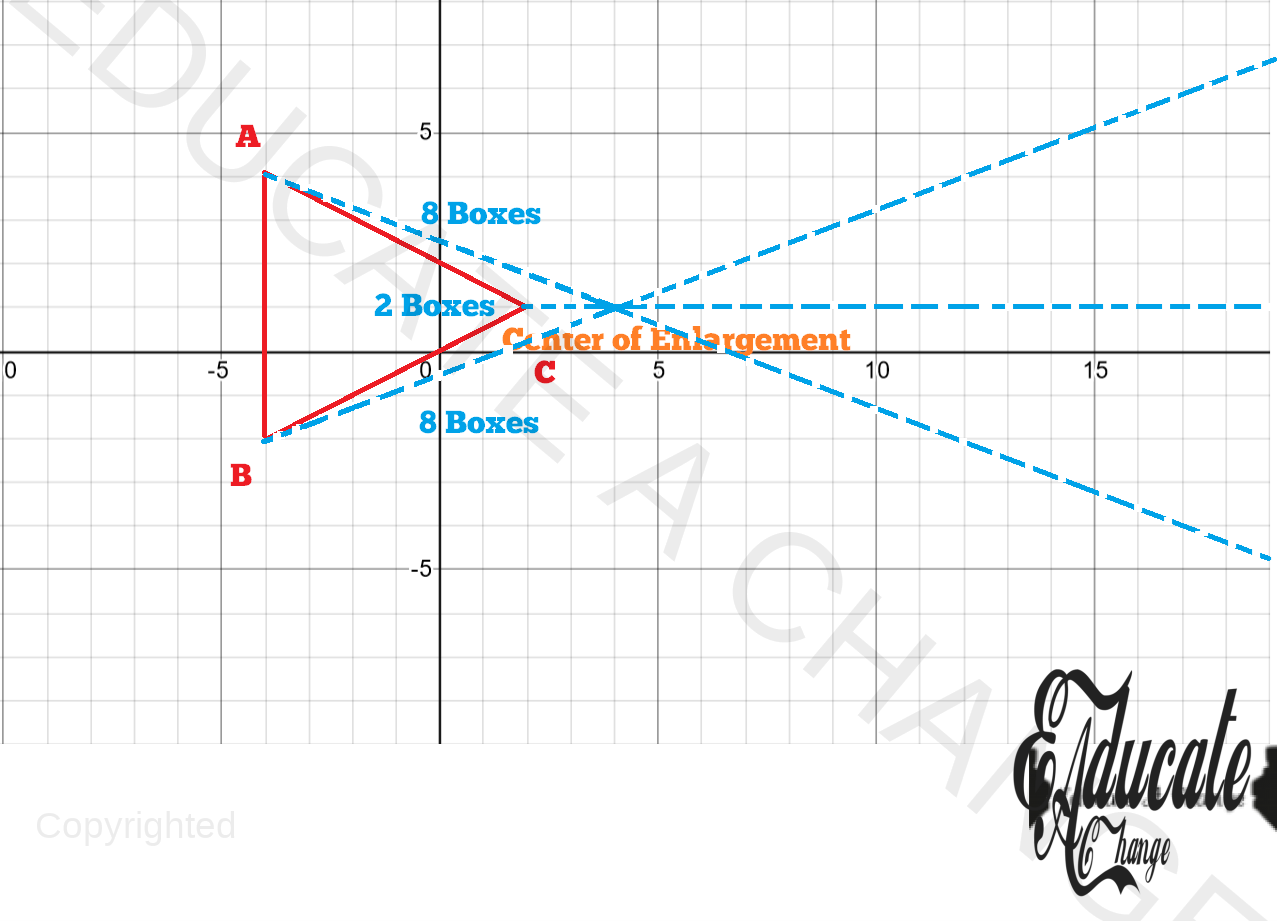
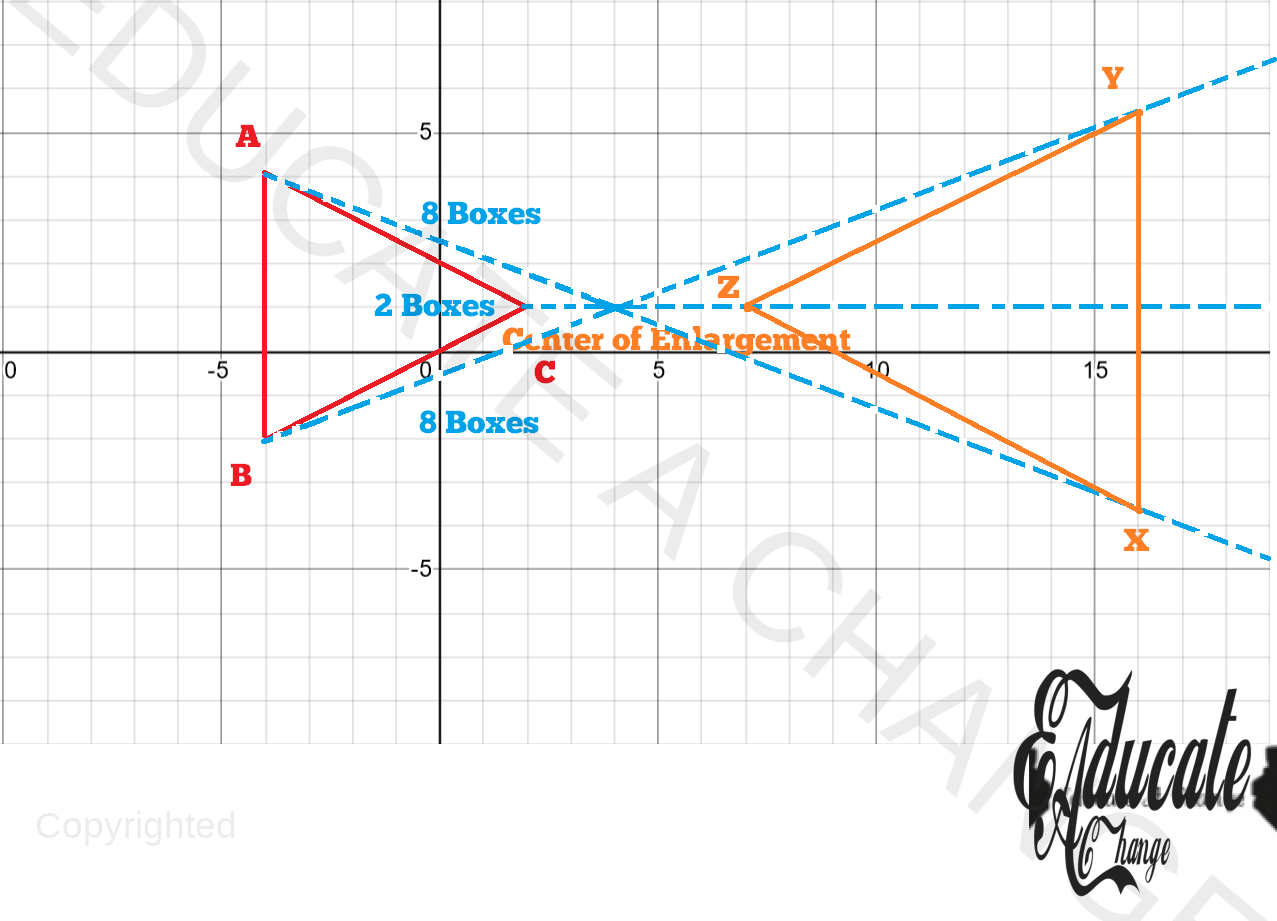
- The object ABC has to be mapped on its image XYZ with the enlargement factor/ scale factor 2. Your center of enlargement is (7, -7).
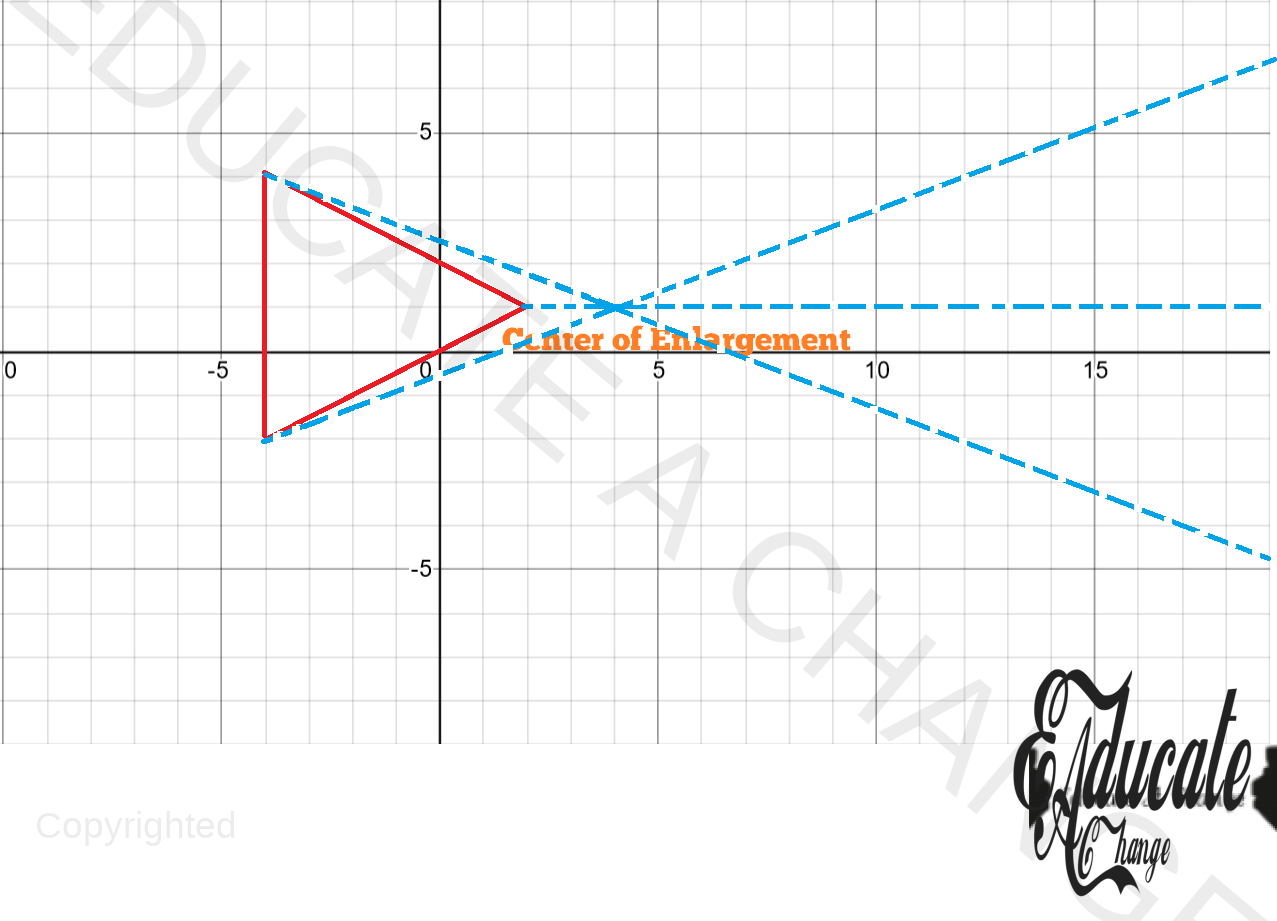
Step 1: Join each point with the center of enlargement with a dotted line.
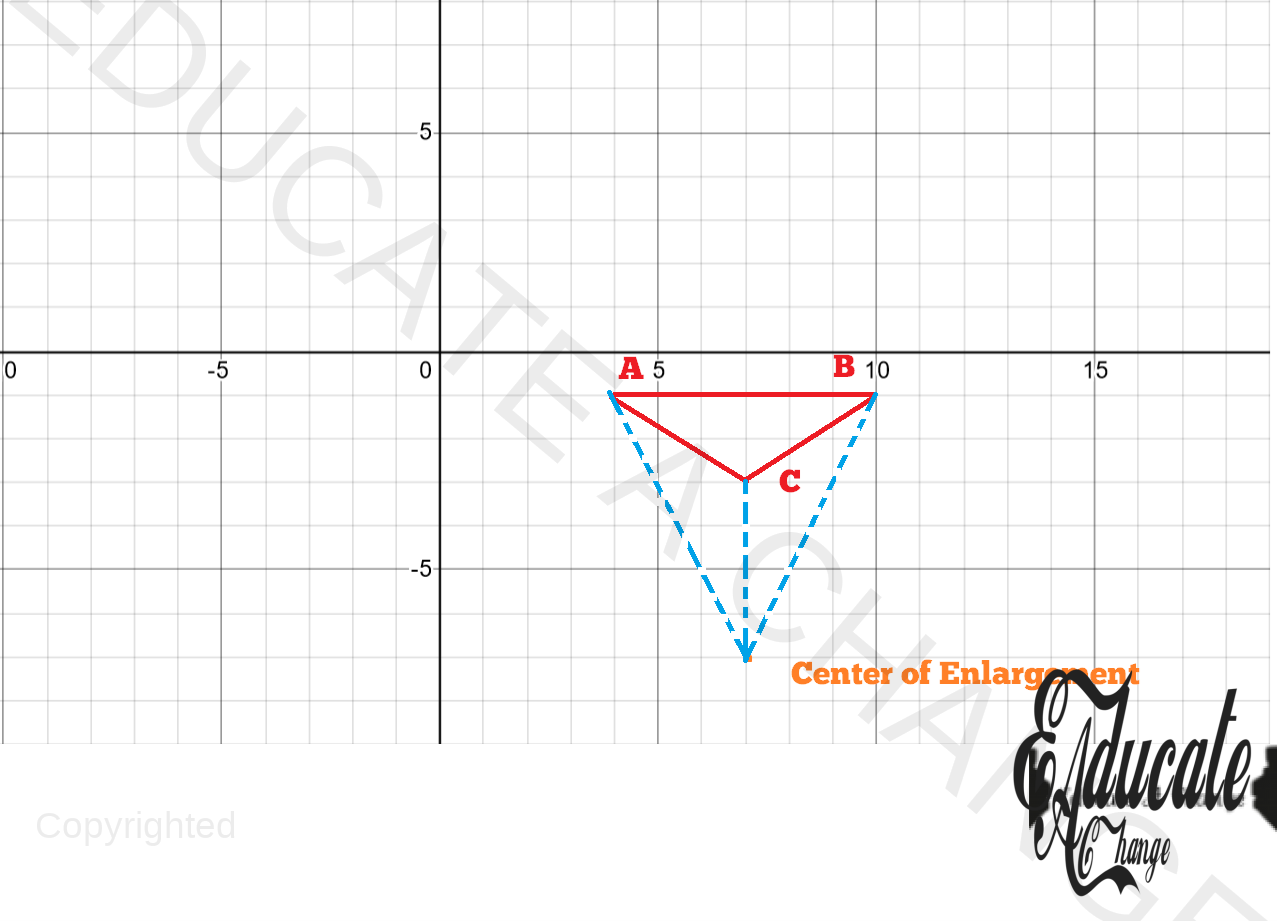
Step 2: Count the boxes from each point to the center of enlargement.
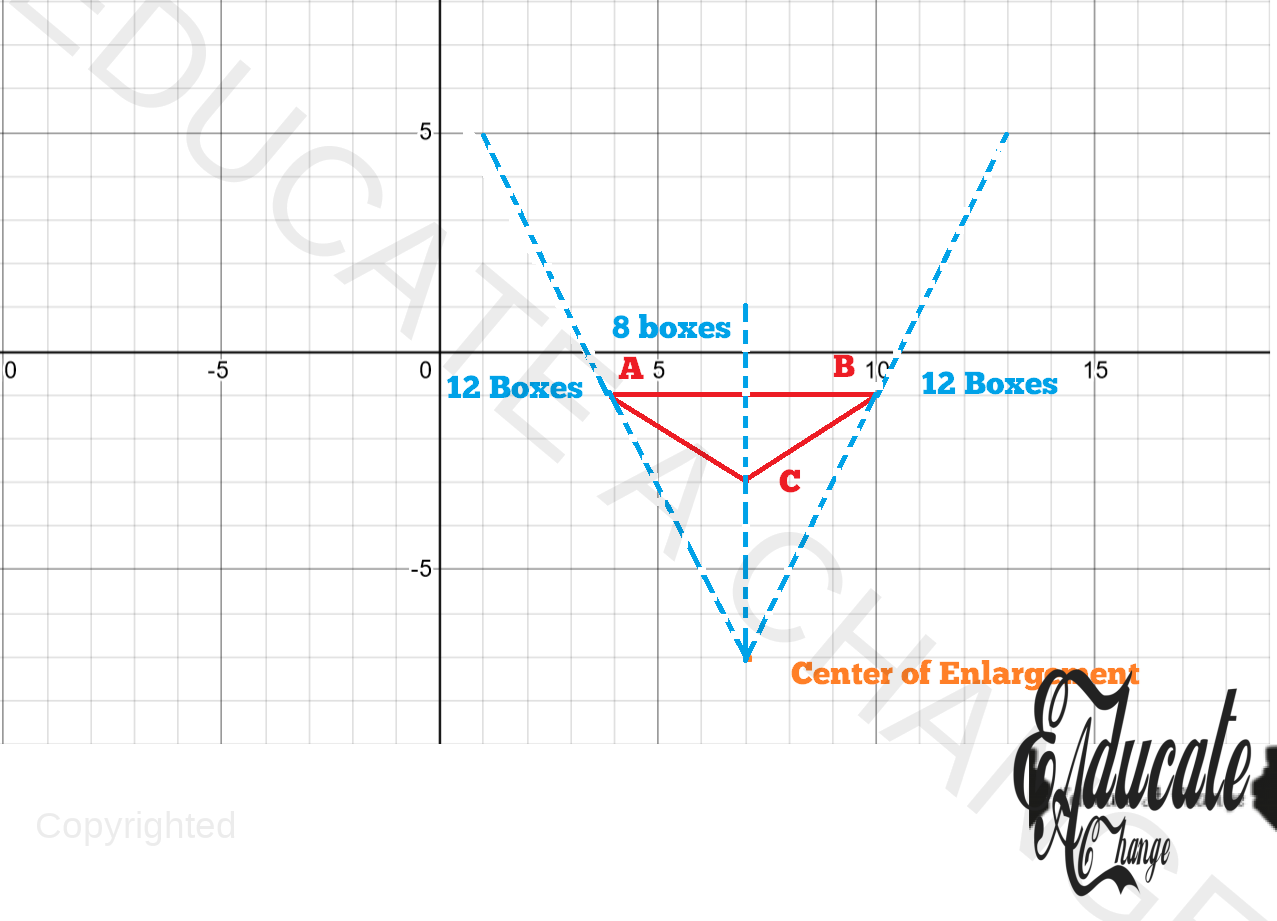
- A is at a distance of 6 boxes from the center of enlargement.
- B is at a distance of 6 boxes from the center of enlargement.
- C is at a distance of 4 boxes from the center of enlargement.
Step 3: Multiply each of the distances with the factor of enlargement. REMEMBER, the sign of the enlargement factor/ scale factor does not matter.
Content by Educate A Change (by Hunain Zia) | Copyrighted by AYLOTI | Redistribution, download, sharing, selling or any form of unauthorized use of data is strictly prohibited |
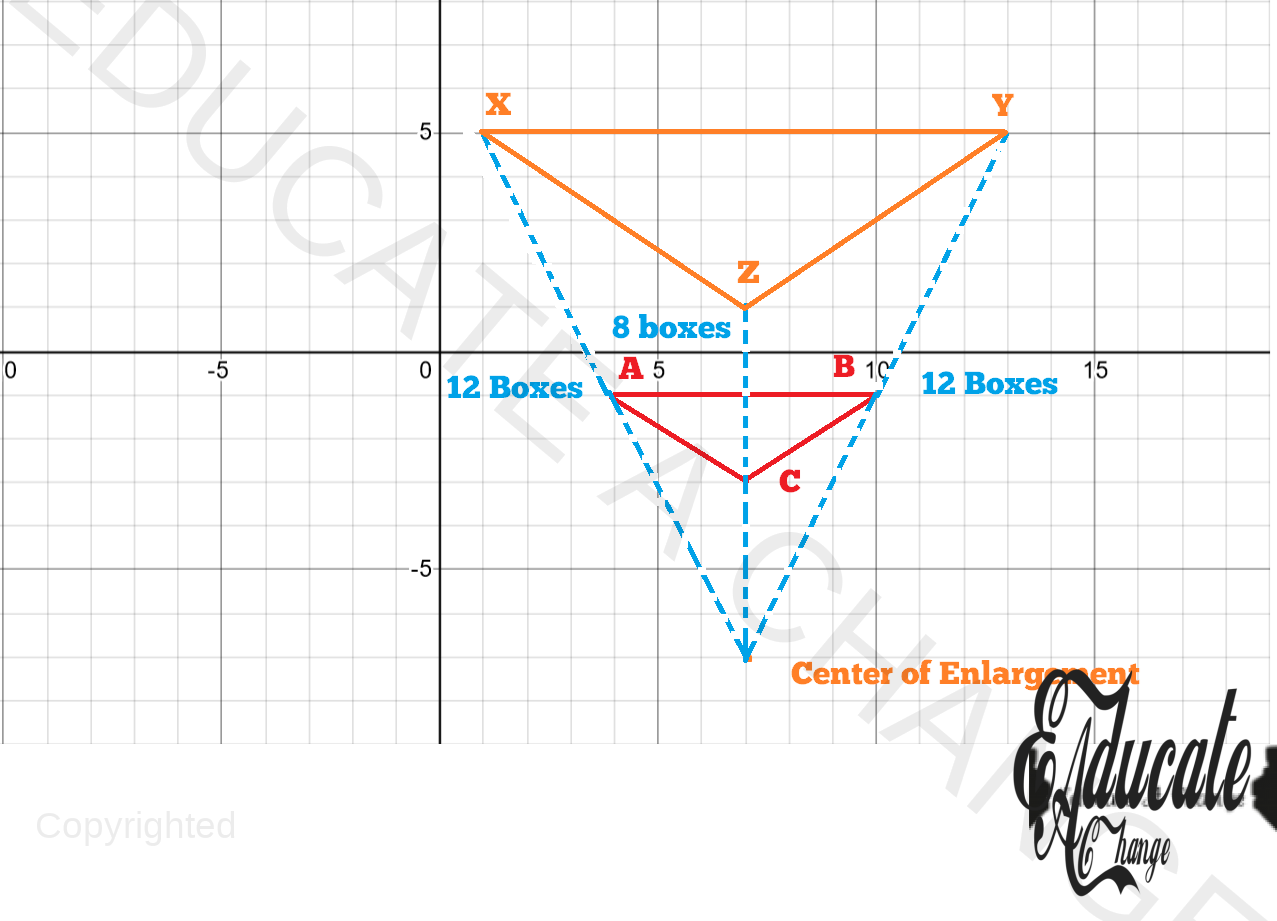
- A’s image X is at a distance of 6*2 = 12 boxes from the center of enlargement.
- B ‘s image Y is at a distance of 6*2 = 12 boxes from the center of enlargement.
- C’s image Z is at a distance of 4*2 = 8 boxes from the center of enlargement.
Step 4: Now extend each line to the total number of boxes required the image. Remember, the sign of the enlargement factor/ scale factor will determine which side of the center will the line be extended to. Here, the factor is positive, so the image will be on the same side as the object. SECONDLY, COUNT FROM THE CENTER OF ENLARGEMENT. DO NOT start counting from the object itself.
Step 5: Draw the Image
Shrinkage
Content by Educate A Change (by Hunain Zia) | Copyrighted by AYLOTI | Redistribution, download, sharing, selling or any form of unauthorized use of data is strictly prohibited |
- Irrespective of the sign of the enlargement factor/ scale factor, if the enlargement factor/ scale factor is between -1 and 1, the size of the object will shrink when it is mapped on the image.
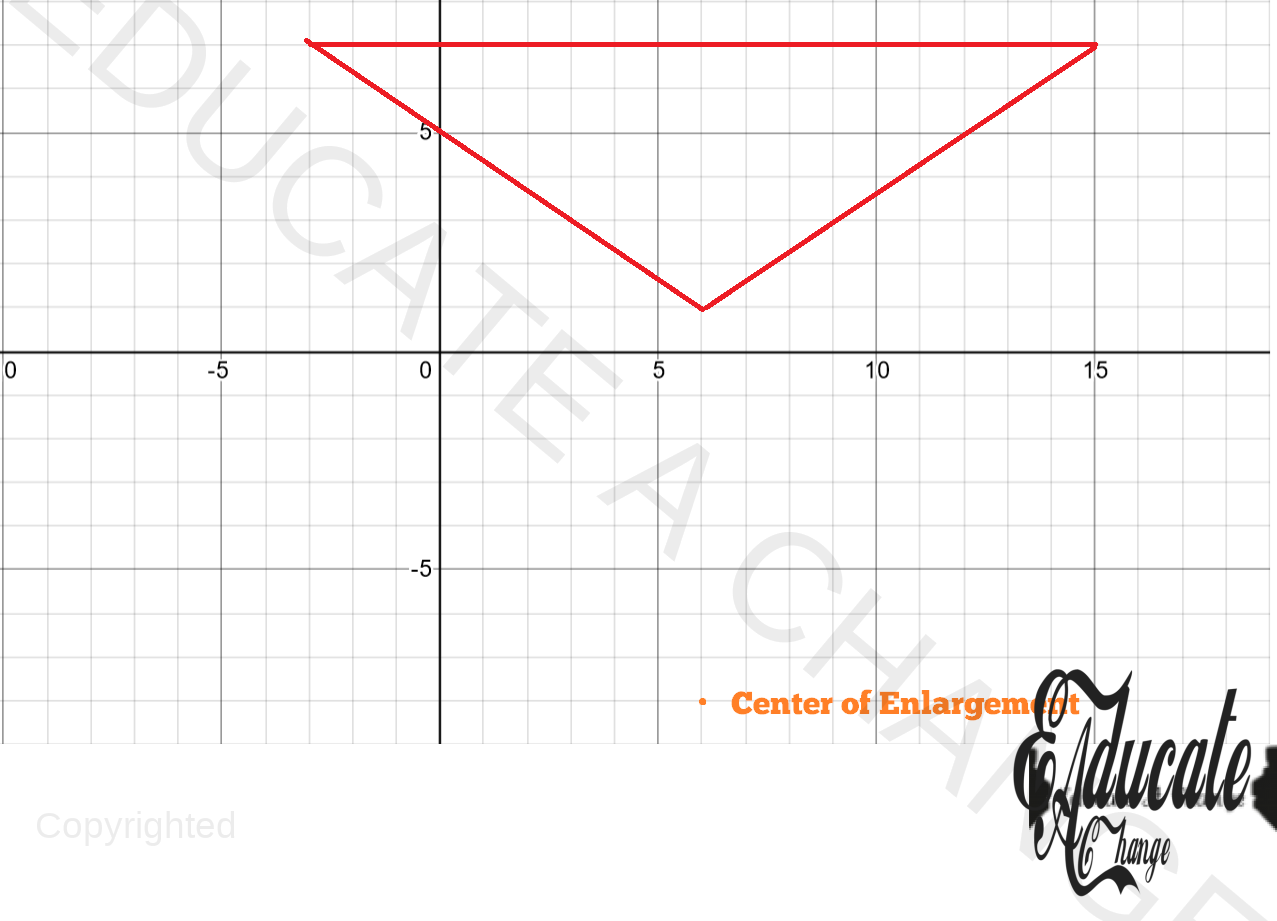
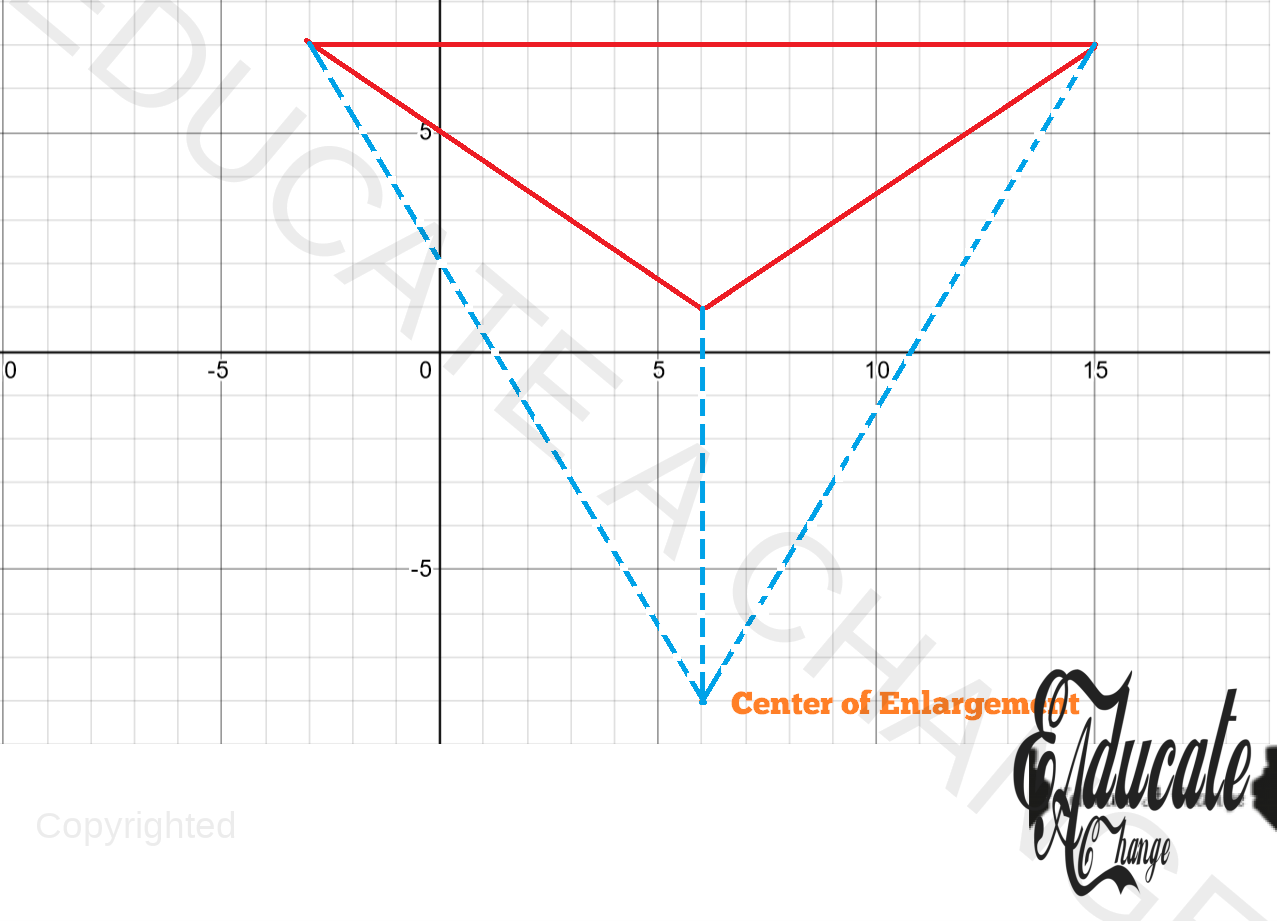
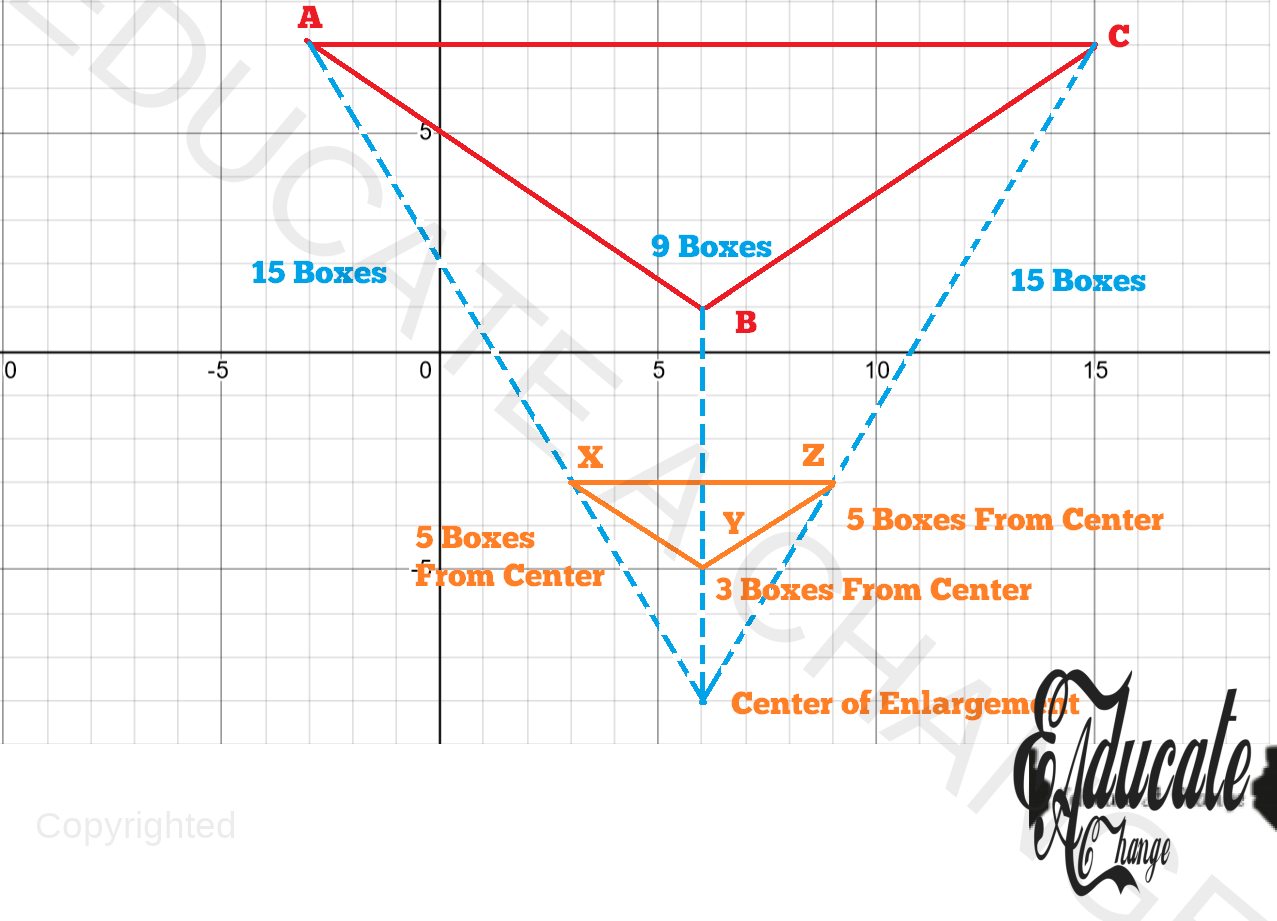
- Map ABC on its IMAGE XYZ using the center and the enlargement factor/ scale factor 1/3
Step 1: Connect each point to the center using a dotted line.
Step 2: Count the boxes for each from the center.

Step 3: Multiply with the enlargement factor/ scale factor to find the number of boxes from center for each of the image point:
- A’s image X will have 15*1/3 = 5 boxes from the center.
- B’s image Y will have 9*1/3 = 3 boxes from the center.
- C’s image Z will have 15*1/3 = 5 boxes from the center.
Step 4: Count the boxes of each from the center and mark the image
When you are given a negative enlargement factor/ scale factor
- Map the object ABC on to the image XYZ using the enlargement factor/ scale factor -1.5 and center of enlargement (4,1)
Step 1: Join the points to the center.
Step 2: Extend the lines in the opposite direction to the center to the direction where the object was because we have a NEGATIVE enlargement factor/ scale factor. Remember, sign determines the side on which it will be drawn.
Step 3: Determine the number of boxes for each point.
Content by Educate A Change (by Hunain Zia) | Copyrighted by AYLOTI | Redistribution, download, sharing, selling or any form of unauthorized use of data is strictly prohibited |
Step 4: Determine the boxes to be marked on the other side by using the enlargement factor/ scale factor.
- A has 8 boxes so the image X will have 8*1.5 = 12
- B has 8 boxes so the image X will have 8*1.5 = 12
- C has 2 boxes so the image X will have 2*1.5 = 3
Step 5: Mark the image
- Make sure you mark the image properly. See where I have marked X and Y. Make sure you use the corresponding lines to determine which side will be labelled with which alphabet.
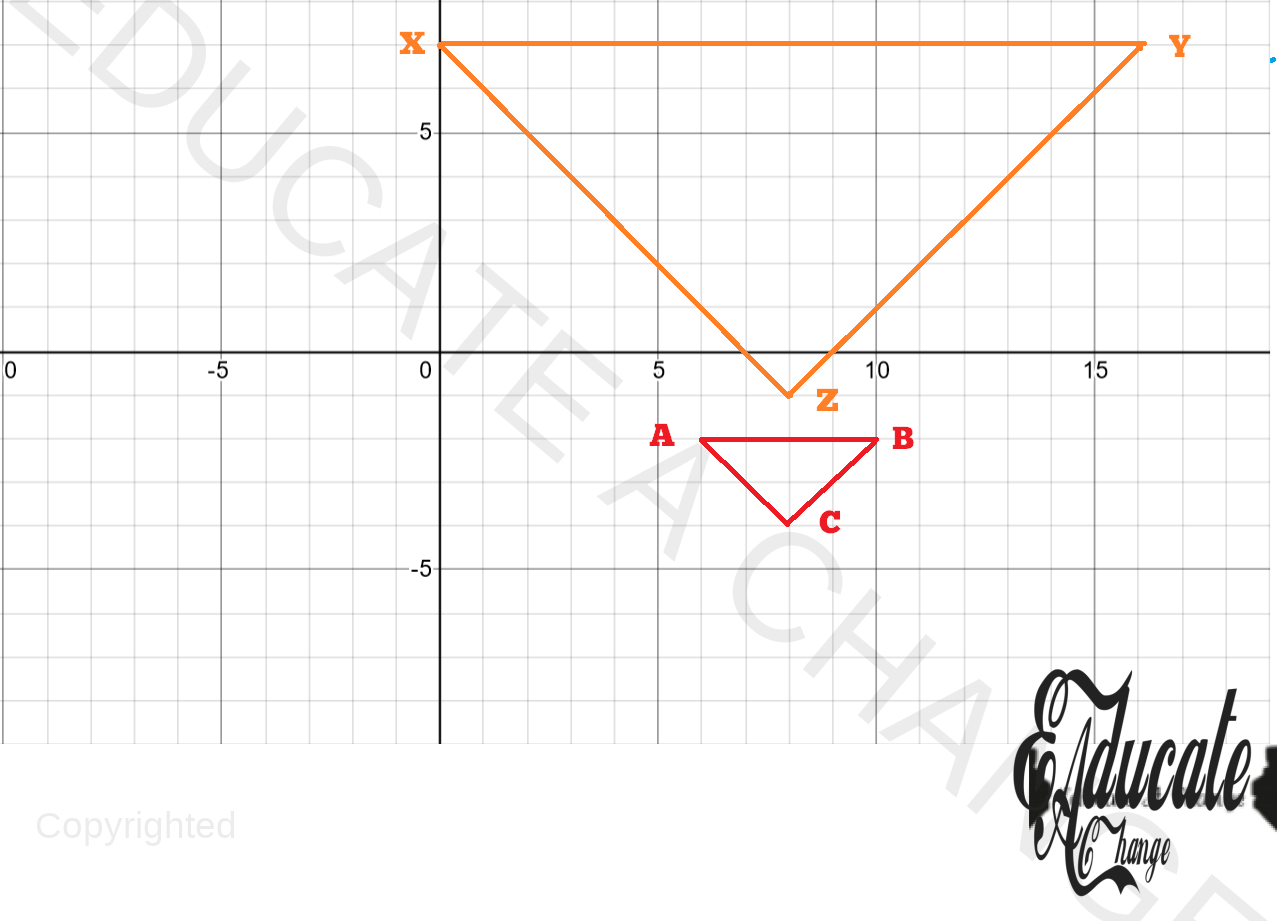
How to find the center and the enlargement factor/ scale factor if the object and the image are given? Type 1: Object and image on opposite sides.
- You are given the object ABC and its image XYZ. Determine the center of enlargement and the enlargement factor/ scale factor.
Content by Educate A Change (by Hunain Zia) | Copyrighted by AYLOTI | Redistribution, download, sharing, selling or any form of unauthorized use of data is strictly prohibited |
Step 1: To find the center of enlargement, we need two pairs of corresponding sides. Join each of the selected object point to its image using a dotted line.
- You can select either
- A and X
- B and Y
- C and Z
- I will select A and X, and C and Z.

Step 2: The point of intersection of the two joining lines is the center of enlargement.
Content by Educate A Change (by Hunain Zia) | Copyrighted by AYLOTI | Redistribution, download, sharing, selling or any form of unauthorized use of data is strictly prohibited |
Step 3: Count the boxes on any one pair. First count the boxes from Object to center. Then count the boxes from image to center. Use a corresponding pair only. I will use C and Z.
Step 4: Divide the number of boxes of the image by the number of boxes of the length to determine the value of the enlargement factor/ scale factor. DON’T FORGET THE NEXT STEP.
- Image has 2 boxes distance from center.
- Object has 4 boxes distance from center.
- Enlargement factor/ scale factor value: 2/4 = 1/2
- Less than 1 means there has been shrinkage.
Step 5: Determine the sign of the enlargement factor/ scale factor
- The object and the image are on DIFFERENT/ OPPOSITE SIDES of the center of enlargement, so the sign will be negative.
- Thus, our enlargement factor/ scale factor is -1/2 and center of enlargement is (4,0).
Content by Educate A Change (by Hunain Zia) | Copyrighted by AYLOTI | Redistribution, download, sharing, selling or any form of unauthorized use of data is strictly prohibited |
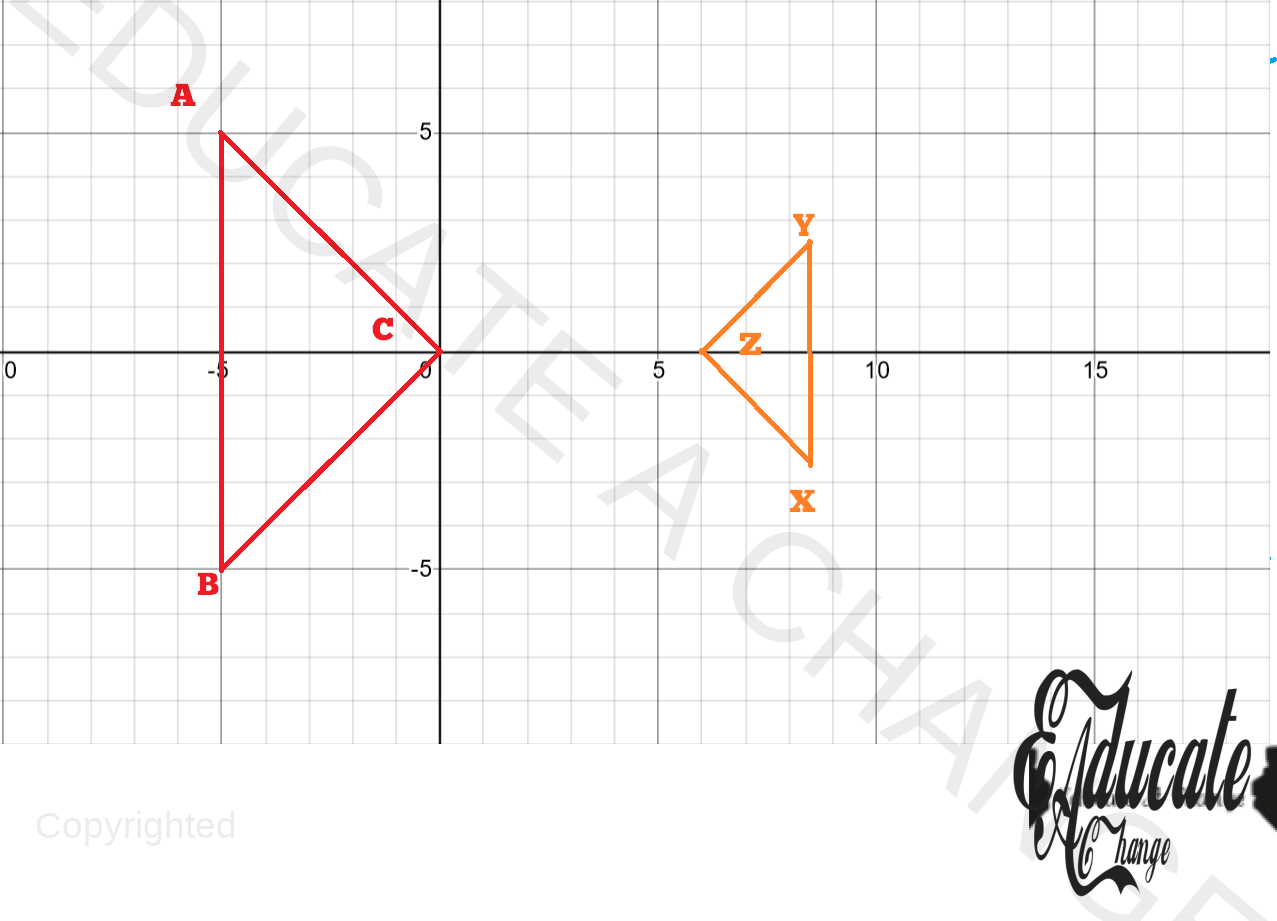
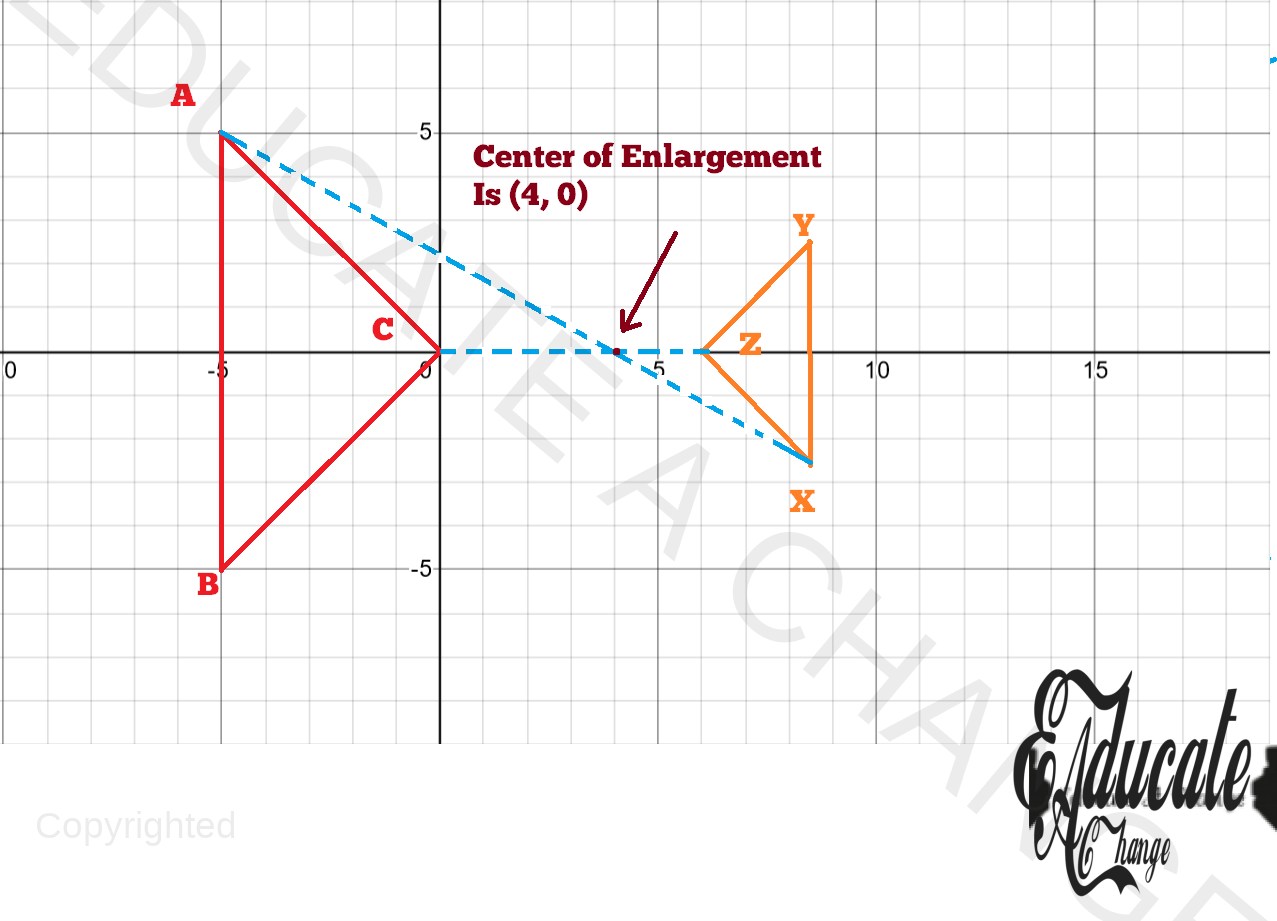
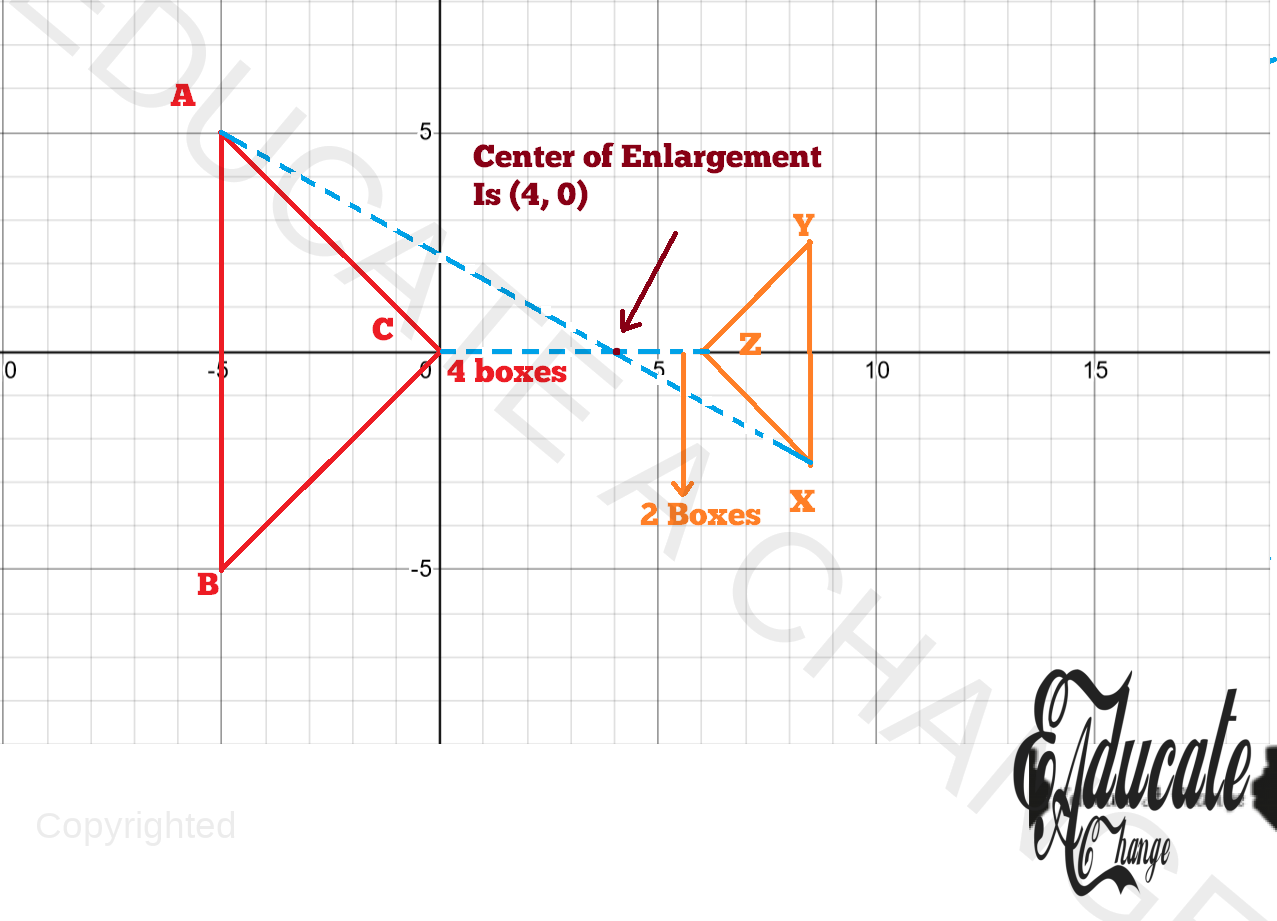
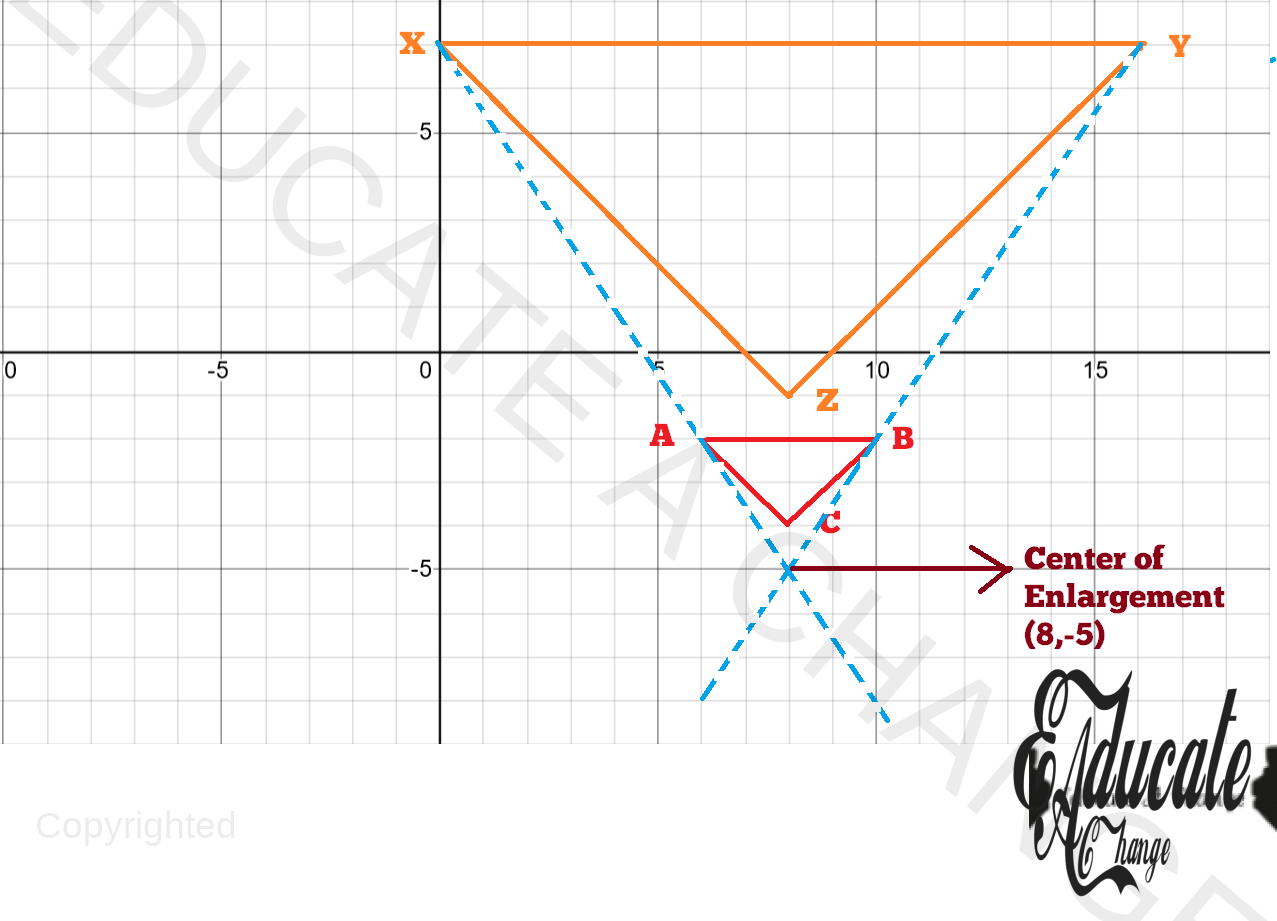
How to find the center and the enlargement factor/ scale factor if the object and the image are given? Type 1: Object and image on same side of center of enlargement.
- You are given the object ABC and its image XYZ. Determine the center of enlargement and the enlargement factor/ scale factor.
Step 1: Connect two corresponding pairs of points. I will select A and X, and B and Y. Join then together with dotted line and extend both the lines until they meet together as the object and the image are on the same side of the center of enlargement.
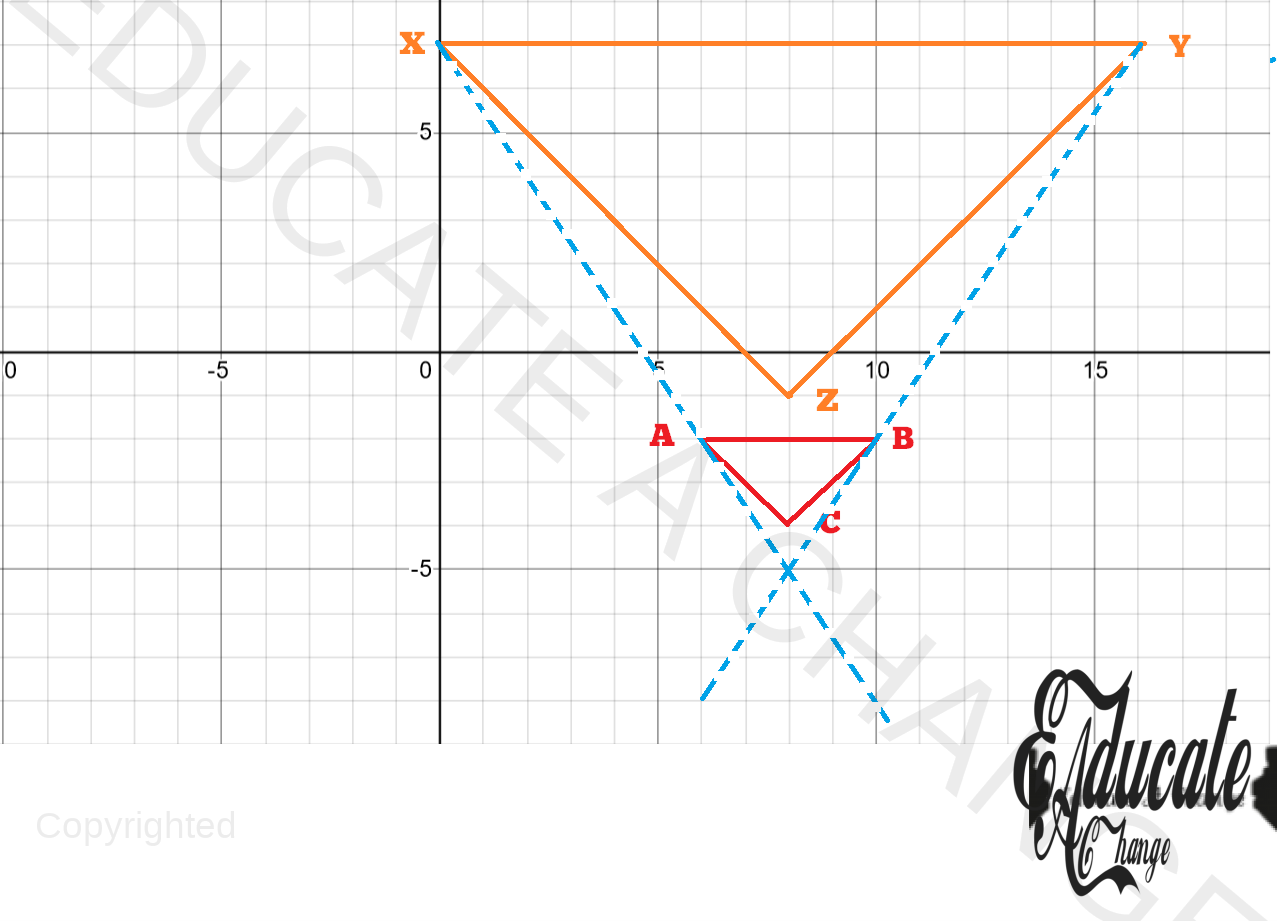
Step 2: The place where they form an X is the center.
Content by Educate A Change (by Hunain Zia) | Copyrighted by AYLOTI | Redistribution, download, sharing, selling or any form of unauthorized use of data is strictly prohibited |
Step 3: For any one corresponding pair, count first the boxes from OBJECT till CENTER. Then, count the boxes from IMAGE till CENTER. DO NOT COUNT THE BOXES FROM OBJECT TILL IMAGE – MAJOR ISSUE.
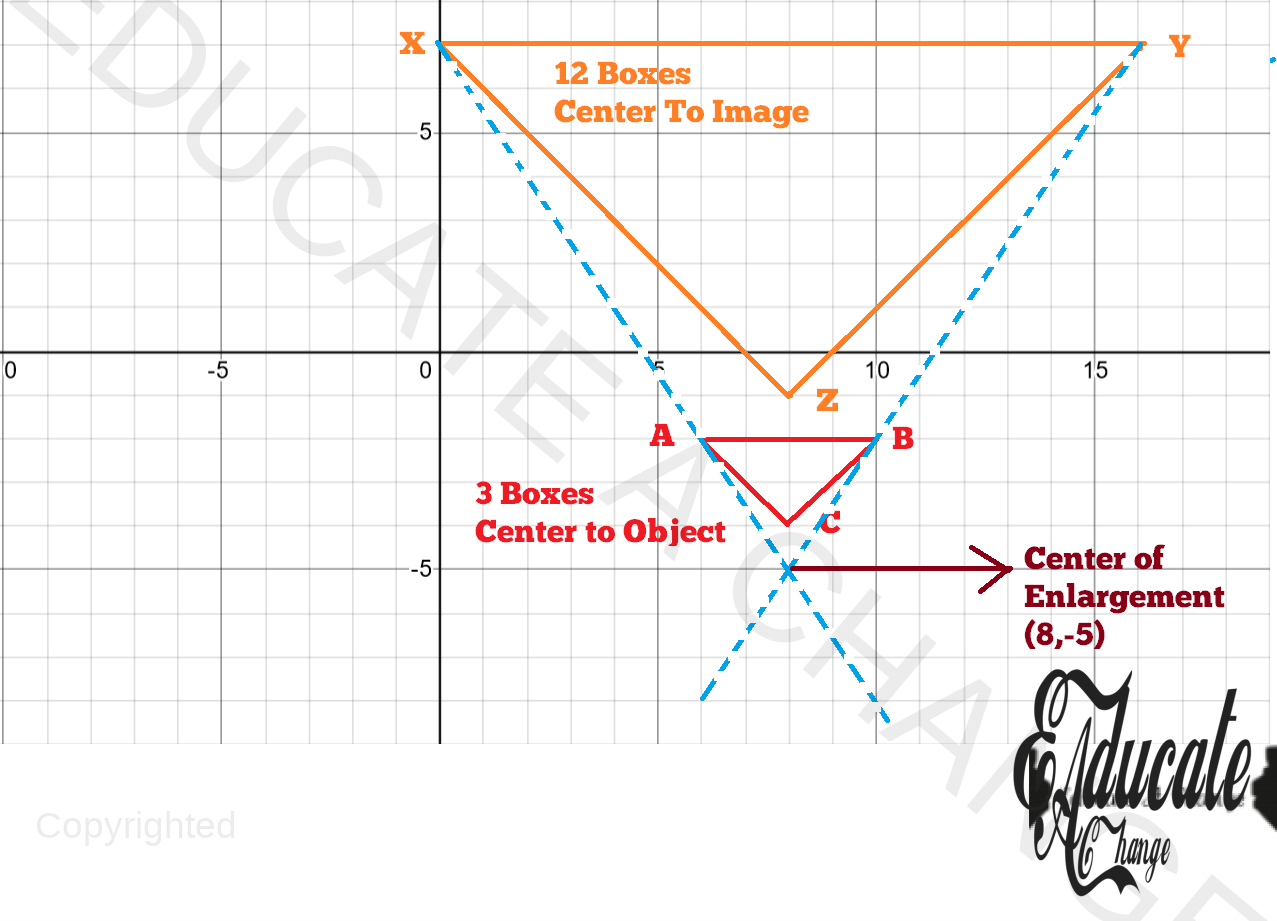
Step 4: Find the value of the enlargement factor/ scale factor by dividing image boxes from center over object boxes from center.
- 12/3
- 4
Step 5: Determine the sign of the enlargement factor/ scale factor.
- As both image and object are on the same side of the center of enlargement, the sign will be positive.
- So the center of enlargement factor/ scale factor is 4 and center of enlargement is (8, -5)
- Remember, you need to provide both scale factor and center of enlargement when describing an enlargement. Center will usually be in the form of coordinates. Providing only one of the two is half the answer, and will deduct marks if you are asked to describe the transformation.
- You can quickly detect if a transformation is enlargement if the object and image are of different sizes.
Content by Educate A Change (by Hunain Zia) | Copyrighted by AYLOTI | Redistribution, download, sharing, selling or any form of unauthorized use of data is strictly prohibited |
Rotation
- For rotation, there are 3 main parts: center of rotation, angle of rotation and direction of rotation
- Most students fail to write the direction of rotation, which is a huge mistake.
- The angles are usually 90, 180 and 270
- The direction is either clockwise or anticlockwise.
Content by Educate A Change (by Hunain Zia) | Copyrighted by AYLOTI | Redistribution, download, sharing, selling or any form of unauthorized use of data is strictly prohibited |
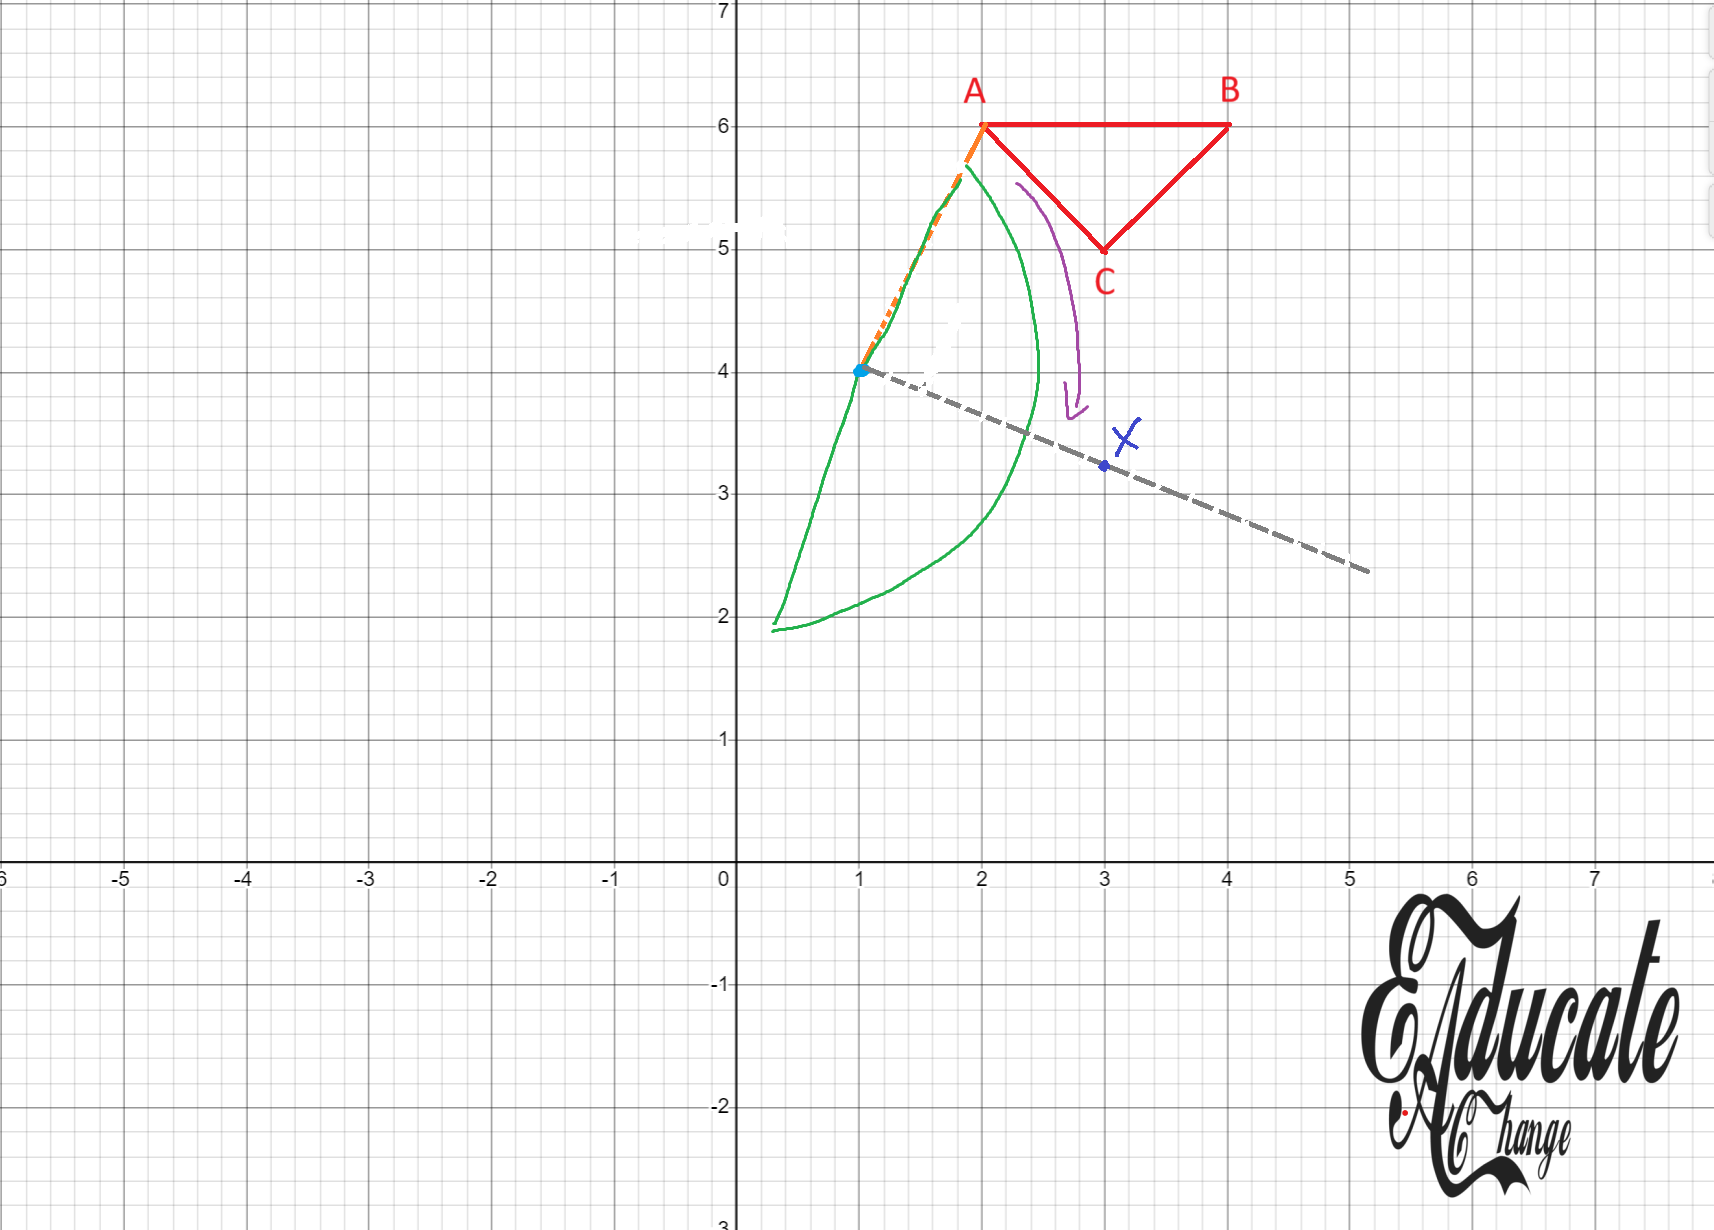
Performing Rotation
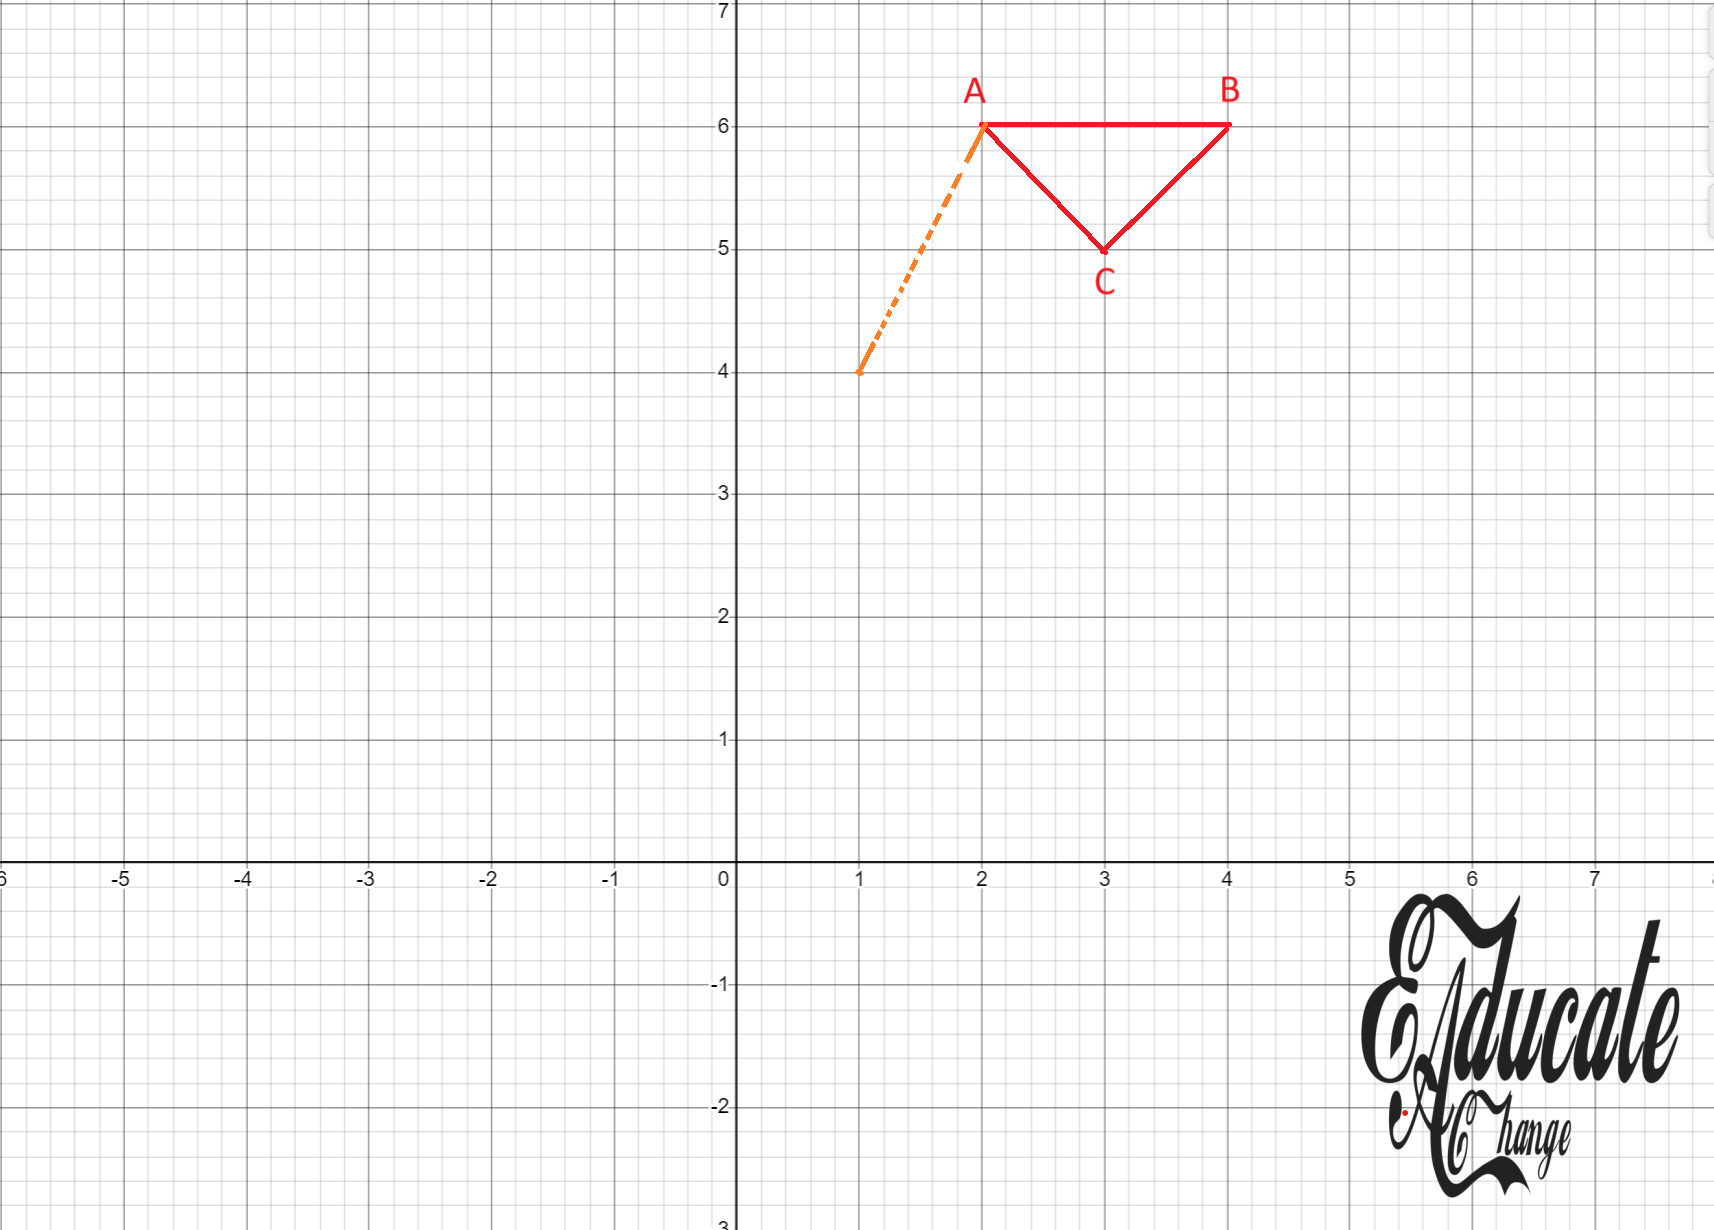
- We have to map ABC onto XYZ by the center (1,4) at 90 degree clockwise.
- Step 1: Join one point of the object to the center of rotation.

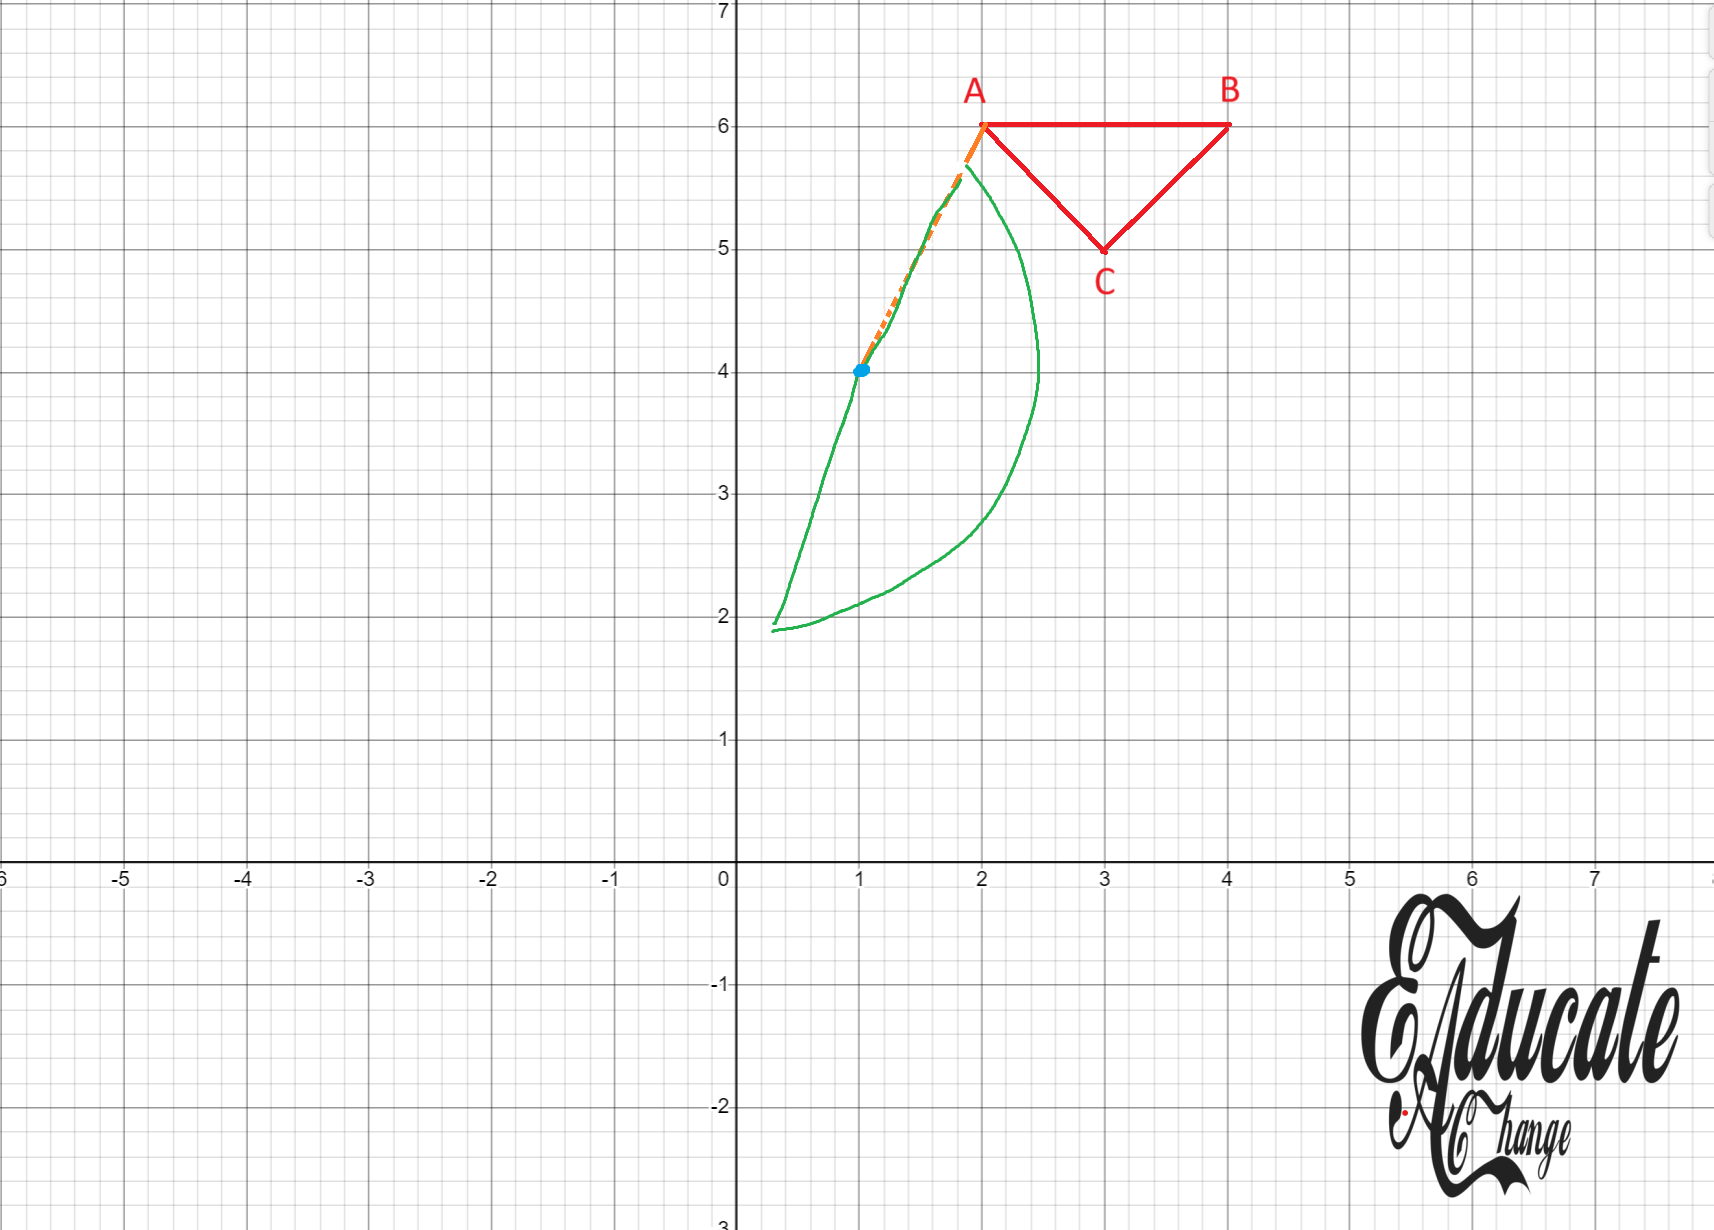
- As we have to go clockwise, we will put our protector as follows
- It’s mid point will be on the center point.
- It will be placed BELOW the line, as that shows a clockwise angle
- It would look something like this
Content by Educate A Change (by Hunain Zia) | Copyrighted by AYLOTI | Redistribution, download, sharing, selling or any form of unauthorized use of data is strictly prohibited |
-
-
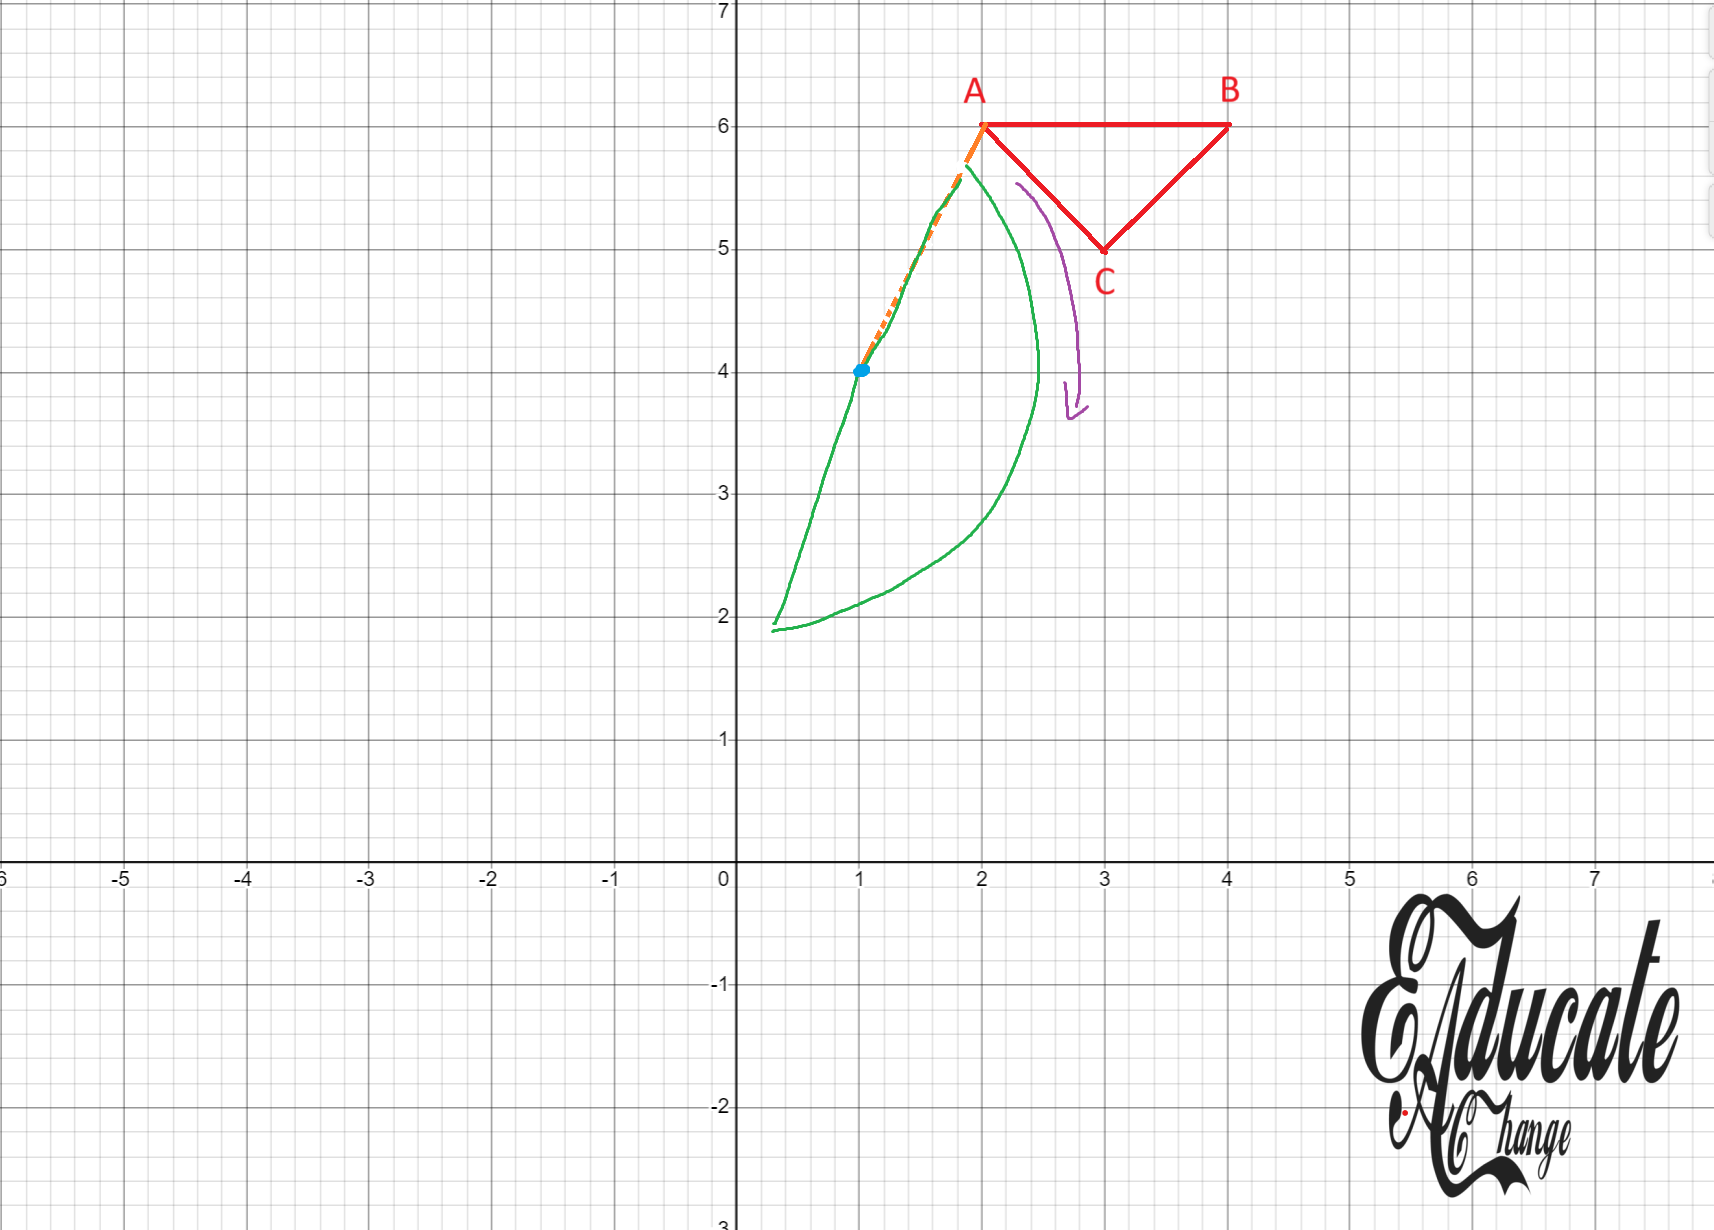
- Here, the blue mark is the center point where the protector midpoint will be. The green part is the compass placed down because we need a clockwise angle
- (If it was a counter clockwise angle, we would have placed it above the line)
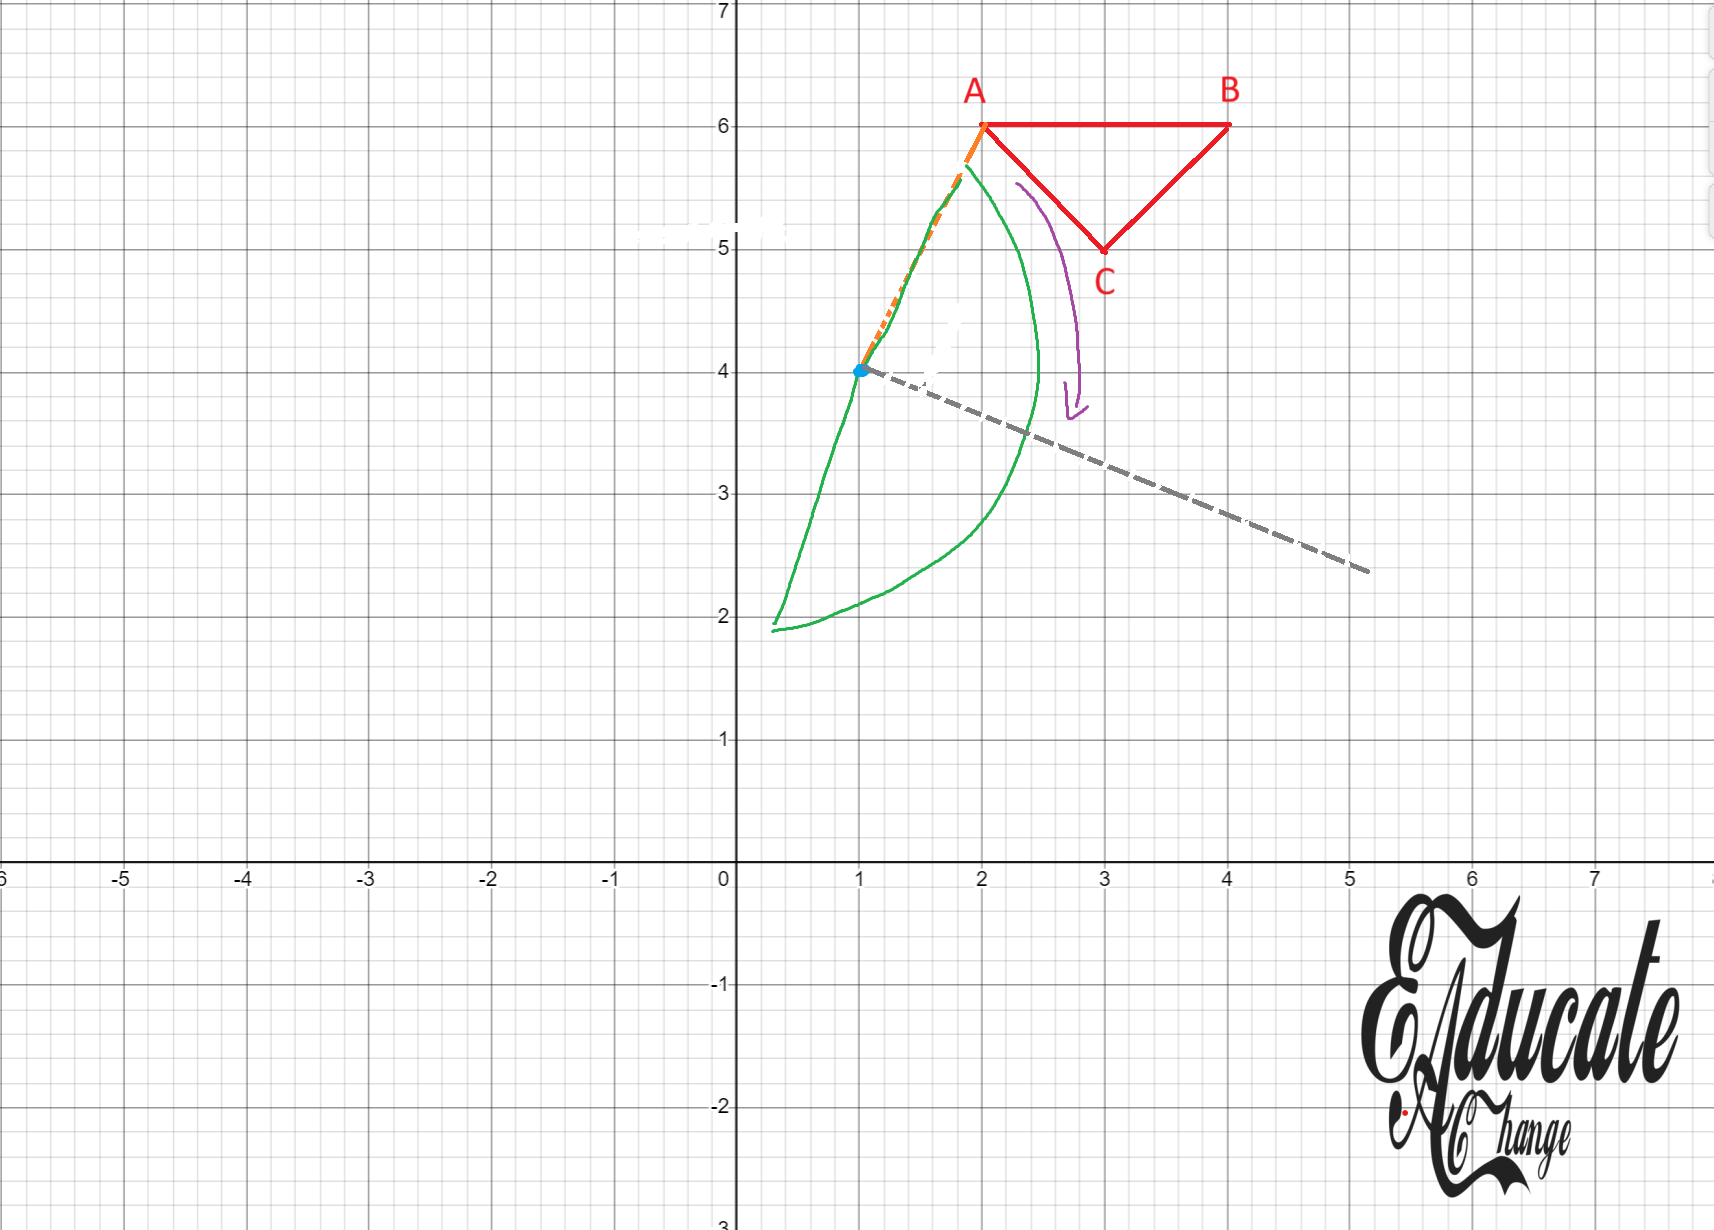
- Now, we need to pick the 90 degree angle, and extend the dotted line.
- Now count the total boxes from the center to the object, and then the same from the center in direction of the dotted line to determine the place of the image.
-
Content by Educate A Change (by Hunain Zia) | Copyrighted by AYLOTI | Redistribution, download, sharing, selling or any form of unauthorized use of data is strictly prohibited |
-
-
- As I can not place a compass virtually, it would be hard to make exact precise image here.
-
- Converting Image to object or finding out missing values between what maps and object onto an image
- The method is simple.
- First, connect two corresponding point sets with lines from the object and the image. For example, if the object the ABC and the image was XYZ, then we can connect, say, A and X and Y and B. The point where the points cut each other (the cross forms) is the center of rotation.
- Then, we can determine if the image is clockwise from the object or the image is anticlockwise from the object.
- Once that is done, Connect the third point that was not initially connected to form the cross from the object to the center. Connect the corresponding image’s point to the center. Then put the compass to determine the angle between the object’s point and the image’s point.